|
A question I've often been asked and seen tossed around on the internet is why some cosplayers choose to take their own photos and the pros and cons of it. So I decided to go over the why's and in a follow-up post I'll cover the pros and cons. Costs Money is, of course, going to be a factor. Photoshoots can be costly depending on the photographer you work with. But it may not always be the most expensive route. Taking your own photos only really cuts costs if you already have your own equipment. Nice cameras cost money and if you want to keep improving your photos, it means continuously upgrading your equipment (better lens, lighting, editing software, etc). These expenses may not be worth the investment for everyone. I already owned a DSLR and found upgrading my camera (as well as my set up) to be worth it in the long run. I make a lot of cosplays, which means I need to do a lot of shoots and that would add up and get pricey quickly! However, don't fret if camera equipment and shoot costs aren't in your budget. There's cheap ways to shoot cosplays yourself using just a phone and plenty of photographers who'll shoot for free (whether it's because they're looking to build their portfolio or they're just super nice like that--not to say photographer who charge aren't nice, people got to pay bills and eat). Finding a Photographer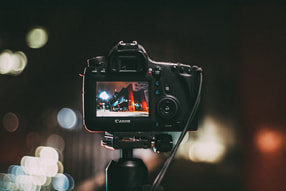 Now finding a photographer to work with can be tricky. There's so many things to factor into it! Do you like their style? Where are they located? Do they have a studio or will you have to find a location to shoot? When are they available and how often? Etc... I come from a small town, so there wasn't many options as far as cosplay photography was concerned. And I'm a bit restricted when it comes to travel so booking with someone a bit further out wasn't an option. I had to use what I had--which was myself or shoot with the help of friends. I also have a particular editing style I prefer and didn't know of any local photographers with a similar style. ComfortComfort is a big thing that made me decide to primarily shoot my own cosplays. Now this isn't me saying anything negative about photographers and any I've worked with. It honestly has nothing to do with them! I'm an incredibly shy person and get very anxious around people I don't know well. So, for example, when shooting with photographers at conventions I never do my best (posing, facial expressions, etc). I go all awkward and shy and hold back so the photos don't turn out as good as they could've. Well, me in the photos. The photos themselves (the lighting, composite, angle, etc) all look great. I just don't look very expressive or my pose is like 30% rather than 100. I'm also very quiet about when I don't like how I look in a photo (since I often don't like how I look in a photo). I'll usually say I like a photo even when I don't like how I look in it. Most photographers are more than happy to retake a shot though (so don't let my issues deter you)! When I shoot my own photos, I end up with hundreds from one shoot! I'll usually get a dozen shots of the same pose because I know out of the 15 I've taken I'll only like maybe 2 or 3. I, personally, just feel awkward asking for some many retakes. I feel the same way about giving directions or asking for a specific shot/angle. This is why I find it easiest and less stressful to work solo or asking a friend I'm comfortable with to help, rather than booking a shoot. Creative Control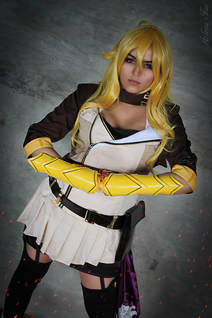 So back tracking a bit here, another reason why I shoot my own photos is so I have full creative control over them. Every photographer has a different style and different editing style! It may be hard to find one with a style you like best. I have a very specific way I like my photos to be edited. That isn't to say I don't enjoy working with other photographers or dislike their styles. I love seeing the variety of photos I get from shooting with others, I just also enjoy having a set of photos I can edit however I please. For example, I prefer editing styles with the super smoothed/retouched skin (I like the "plastic"/magazine look, personally) and often have to edit my eye color since I don't wear contacts. Not all photographers edit their photos this way (and that's okay), so it's nice to have some say in the edits that are done. I should mention, there are plenty of photographers who allow their photos to be edited by the cosplayer or someone the cosplayer may hire, so it's not impossible to find someone who'll allow the photos be edited in a way you prefer. It's just easier for me to have all the rights from the start by self shooting, rather than searching for a photographer who edits similar to me or will allow edits. Photo & Print Rights Photo rights in general (not just the right to edit) is one of the biggest reasons I prefer to self shoot. When you shoot with a photographer, the photographer owns all the rights to those photos unless you sign a contract otherwise. Now most photographers don't mind if you share those photos on your social media, website, etc.. It was probably what you both assumed they would be used for from the start. When money comes into play is where it gets tricky though. I sell prints both online and at conventions. I also distribute cosplay photos to patrons on Patreon first (they get a first look at cosplay shoots I do). If I were to shoot with a photographer, I wouldn't have the rights to do this--I'd have to ask first and work out some sort of contract. I'm not sure what sort of fees photographers may charge for posting to a paid tier on Patreon, but I do know that a lot of the times print rights come with some sort of fee (it can be anything from a flat rate to a percentage of each sale). My prints don't sell a ton to start with so anyone who charges a flat rate fee is out of the question and I already don't make much of a profit off of prints, so losing another percentage of the sale isn't too appealing. Now this may be worth it if your prints sell better and if the photo is one you really love and think will sell well. But for me, it's just not the best investment. Again, I should mention there are some photographers that don't charge anything extra or will give away print rights for free. I simply prefer to have control over a set of photos for each costume, without having to deal with any sort of contracts or legal things, so that I have options to create and sell prints and can post early access content to my Patreon. Photo/Content Demand Now this is another big reason why I choose to self-shoot. I have a Patreon where I try to make a new costume each month (sometimes it'll be every other months and other times I may have several in one month). This means I need to do a lot of shoots and I need photos quickly. That's a lot of content to demand from a photographer--especially if you only find a handful or less in your area to work with. I feel like I'd basically be looking for someone to be my own personal photographer and editor (and I can't afford that). So it's a lot easier for me to self-shoot. I know when I need content and can take a few hours out of my day to edit some photos and post those whenever I need them. This also means, if I fall behind on content, I have no one to blame but myself and can usually easily fix that or adjust my schedule to make up for it. I won't be relying on someone else to get new content to me and needing them to do so quickly. So these are the reasons I decide to take my own cosplay photos! While I'm always more than happy and willing to work with other photographers, especially at conventions, I'll always do my own self-shoot of each costume. It's a way I can easily create the amount of content I need and maintain control over the photos without any contracts or legal hassle.
If you were wondering as to why some cosplayers choose to self shoot, I hope this gave you a bit of insight! ~Positive Outcomes Only~
0 Comments
For anyone who's wondering how I edit my photos. These are editing techniques I use mostly for cosplay or human-subject photos (in other words, something like food or scenery doesn't get edited this much or even goes through these techniques/tools). So of course, go through and pick out all the photos that are keepers and will move on to the editing phase. I use Photoshop Elements 8.0 to edit my photos. The photo I'm using in this example is a photo I took of my friend and cosplayer, Courtneykissme, in her Arcade Miss Fortune (from League of Legends) cosplay. 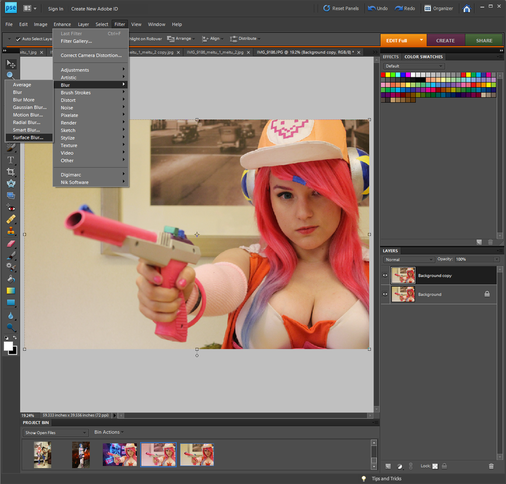 So one of the things I like to do is create super smooth skin to make it look as if the photo is a digital painting or straight from the anime/video game (some great examples--and editing skill goals--are the amazing and professional shot Lightning--from Final Fantasy--cosplays photos you'll see around the internet). This is how I achieve that effect or something similar to it. Duplicated the original image into a new layer. Right click on the image and select Duplicate Layer. Make sure the new layer is selected. Then hit Filter -> Blur -> Surface Blur 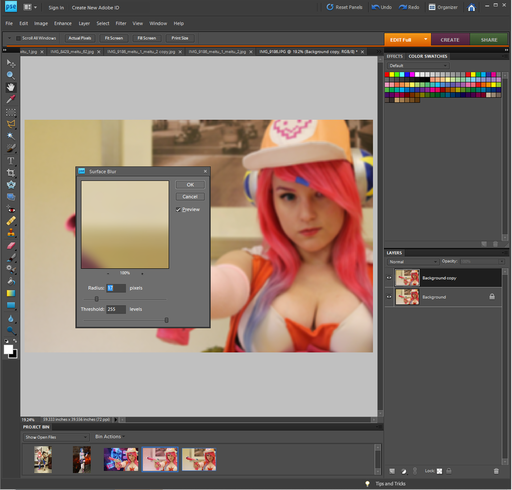 Once you've selected Surface Blur move the threshold slider all the way to the right, maxing out the numbers. From there adjust the radius glider so that the face appears blurred but still recognizable. 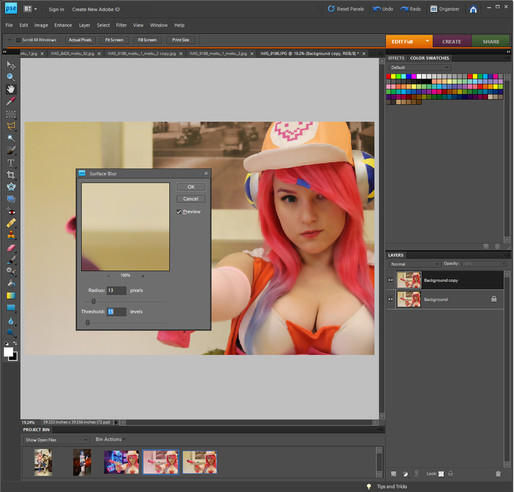 Once you've set the radius glider move the threshold glider to the left until the skin appears smooth but not blurred. It'll usually start looking right around the same number setting as the radius or slightly lower. Hit okay. 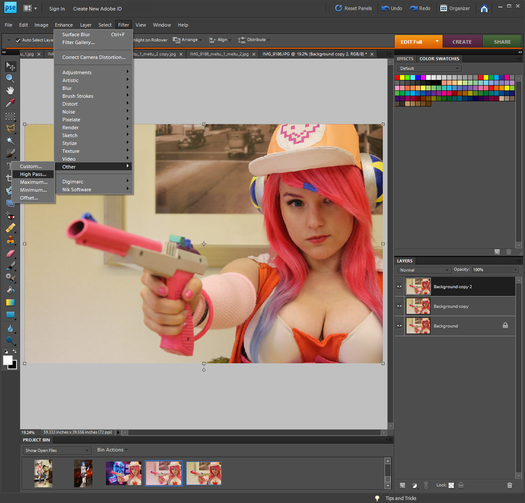 Make another duplicate of the original image and move it so that it is the top layer. Make sure that layer is selected. To add some definition and details back into the clothing articles and hair hit Filter -> Other -> High Pass.  From there adjust the glider so that you can see the details in the hair, skin, clothing. For this you're going to have to eyeball it. Try not to put the glider so far to the right the color begins to return (you'll see what I mean if you glide it to the right). Hit okay. 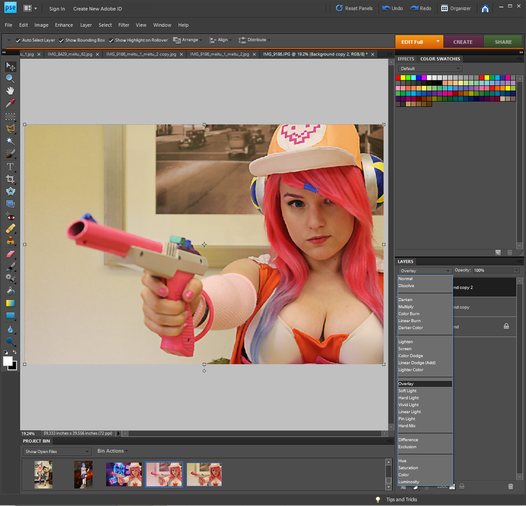 We don't want the photo stay grey. In order to change this go to where it says Normal and has a drop down menu above the layer listings. Click the drop down arrow and select overlay. 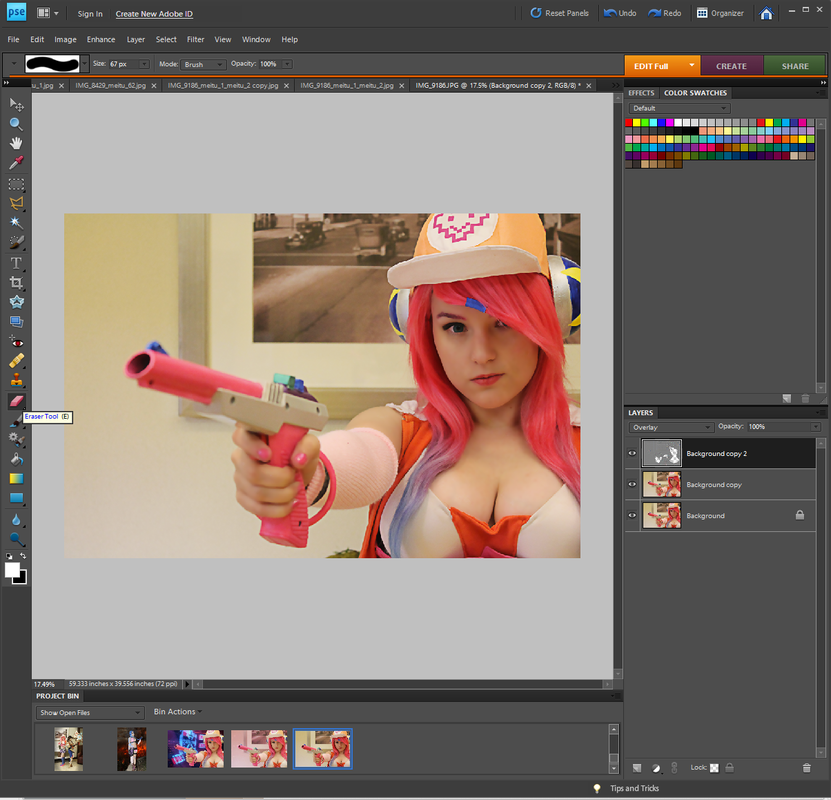 Everything will appear to have more detail and definition again, but I still want the skin smooth and almost-digital looking (aka I want the Surface Blur-ed layer to be what the skin looks like). Still working on the same layer (the High Pass-ed layer), select the eraser tool and begin to erase anywhere the skin is. Feel free to erase any other areas you want to appear smooth or have the effect it was given on the Surface Blur-ed layer--I just stick with the skin. Tip when erasing; work slowly. I avoid just erasing over large connected patches (such as the face and the neck) carelessly. I don't want the line of definition between two areas to fade and soften so I erase ever so slightly around them, avoiding the line itself. Example: I won't just scribble the mouse/tool over the whole face, I avoid the eyes, lips, brows and move around the nostrils and lines defining the nose and jawline. 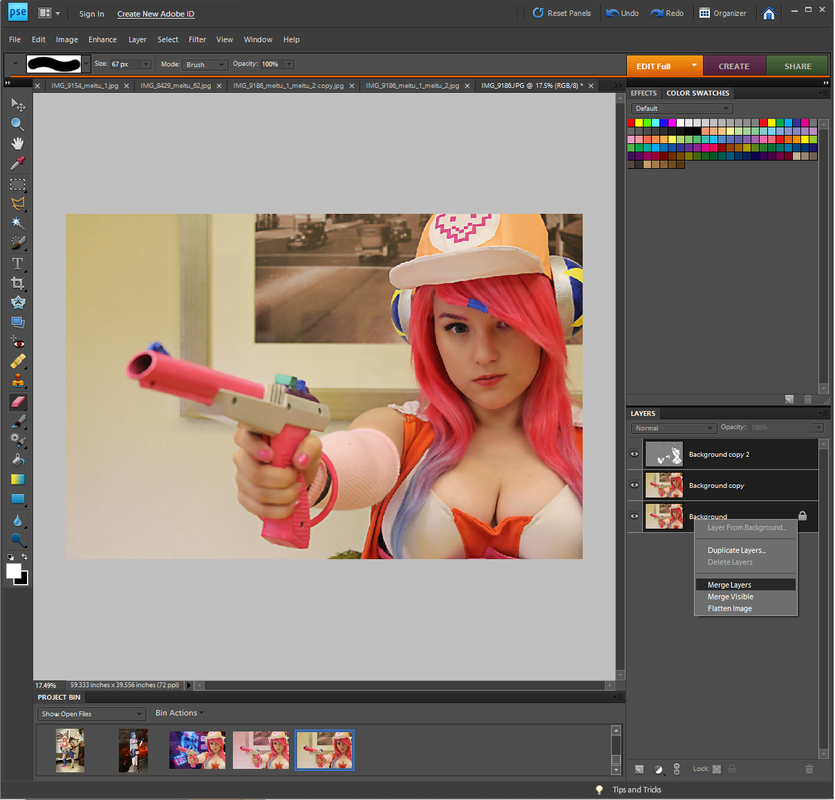 Once your happy with how everything looks so far, merge the three layers together. Ctrl+Click all three layers --> Right Click --> Merge Layers. 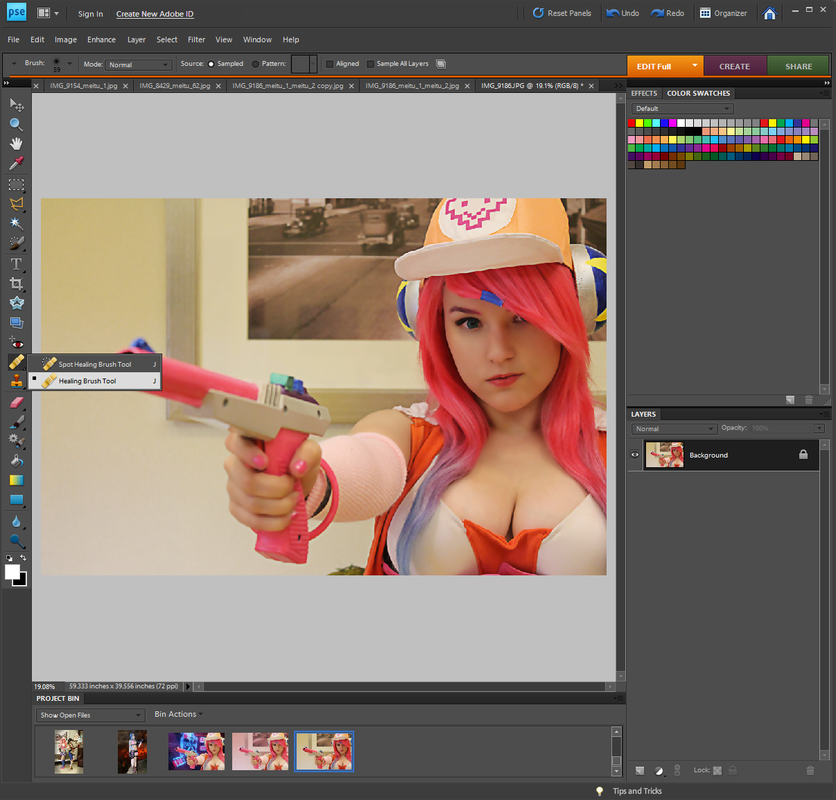 Another thing I do is remove any blemishes, spots of discoloration or dark circles. This can be done at any time, although I do prefer to do this as a first step. For this I use the Healing Brush Tool found in the tool bar. You're able to Alt+Click any spot of skin without blemish/discoloration, then Left+Click any spots you want to cover up. This helps the skin look smooth, clear, even and helps the photo look professionally done. This isn't a necessary step, it's all up to personal preferences and not everyone "needs" this editing done. I just feel it helps give the photo a professionally done feel. I also stated that I do love when photos look like they're straight from the game/animation, or close to it. 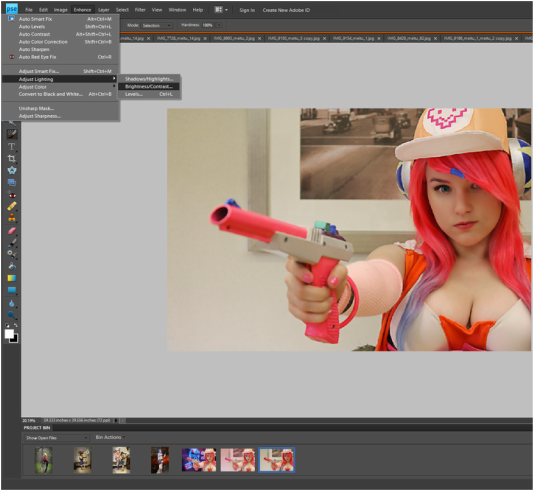 Another thing I will do, especially for photos taken in not the best lighting, is adjust the lighting. Enhance --> Adjust Lighting --> Brightness/Contrast. 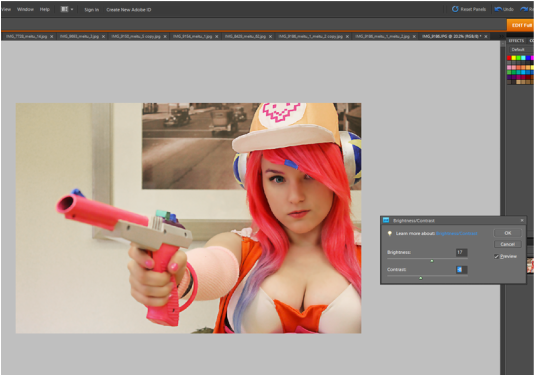 Adjust the brightness or contrast by moving the gliders. This is all left up to personal preference and what you feel looks best. Hit okay. 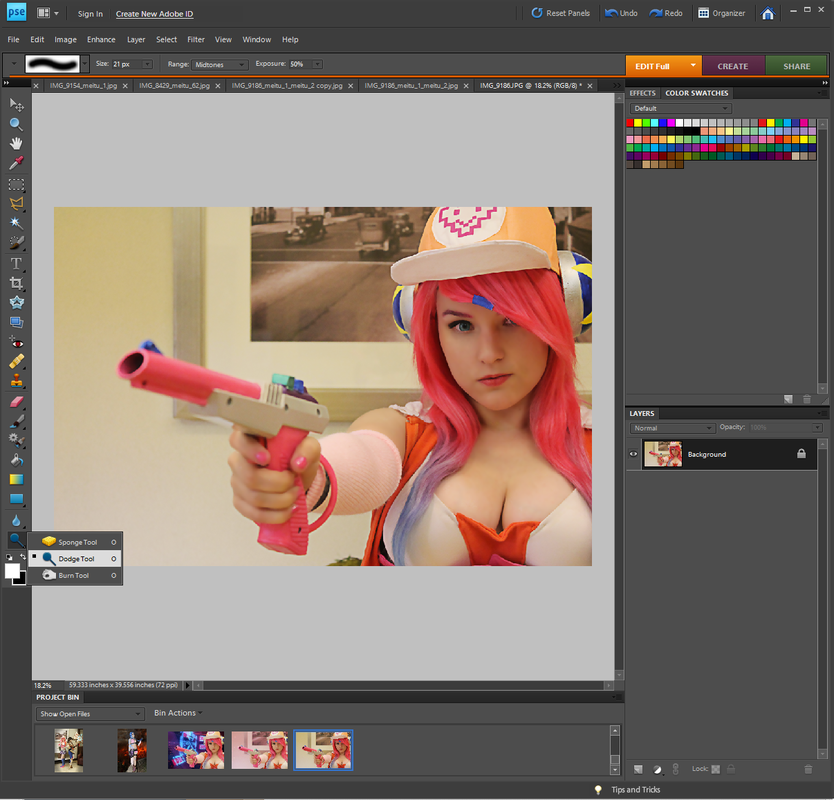 Since I don't wear contacts I'll alter the eye color (the cosplayer in this photo is wearing contacts though). I didn't get a screen shot of this but basically. Create a new layer. Using the basic paint brush tool and the color of your choice, carefully color the iris of your eye (the colored part). Once both eyes are filled in adjust the opacity to make it look more natural. You want details and shadows from the underlying image to show through but not so much that the color of the eye doesn't change. You can also soften the lines using a slight Gaussian Blur. Another way of changing the eye color is selecting the iris of both eyes. Enhance --> Adjust Color --> Adjust Hue/Saturation. Move the Hue (top) glider until you achieve the color you want. Do this on either a duplicate layer of the base/original image or the original image itself. Something I'll almost always do as well is use the Dodge Tool on the iris of the eyes. Since my eyes are really dark and remain having a very dull or dark look to them even after changing the eye color I like to brighten it up and/or add highlights using this tool. Make sure the brush size is small and to remain in the iris of the eye only. I'll sometimes overlap brush strokes a couple times to make it brighter/more highlighted in certain areas (pay attention to where the light is hitting naturally). 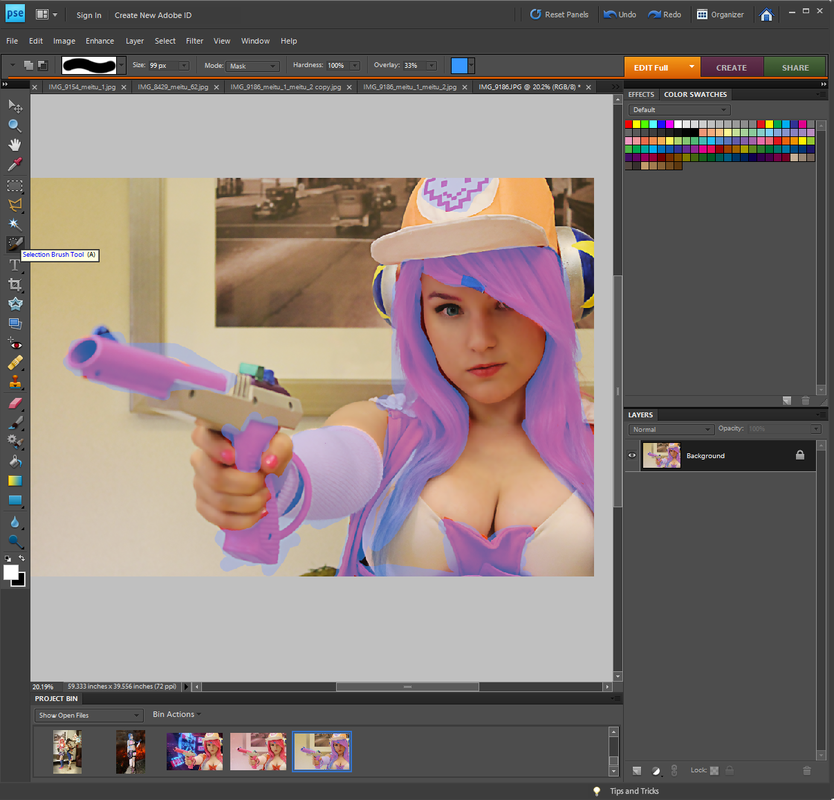 Note: This is sloppily done because I just did it for screen shot purposes. Please know when actually editing I use and try my best to keep neat clean lines. Another thing I do is add to and take away from specific colors and areas. In order to avoid taking hues away or adding them to areas you don't want to, use the selection tool and select the area you want to edit. 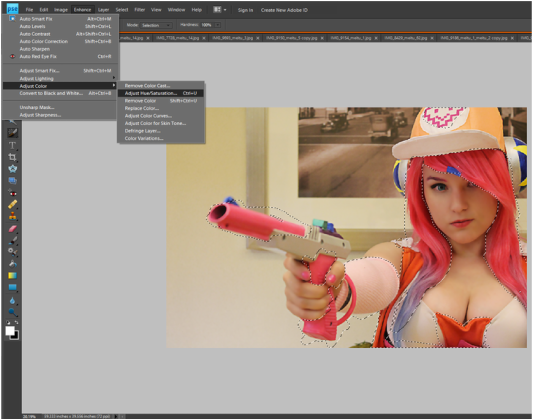 Once selected, go to Enhance --> Adjust Color --> Adjust Hue/Saturation. 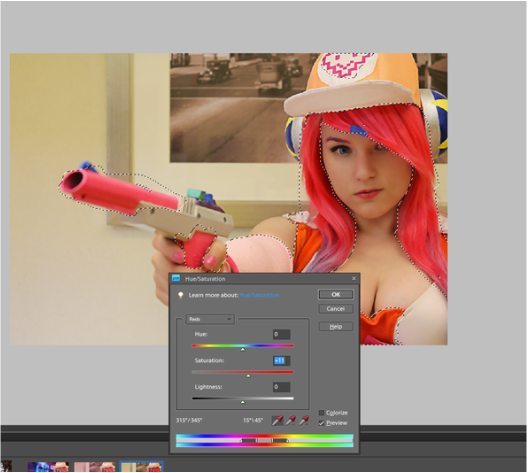 For this specific photo I want to brighten up the pinks in the costume and hair. So in the drop down menu I select Reds and more the Saturation (second) glider more towards the right until I like the coloring. Hit okay. 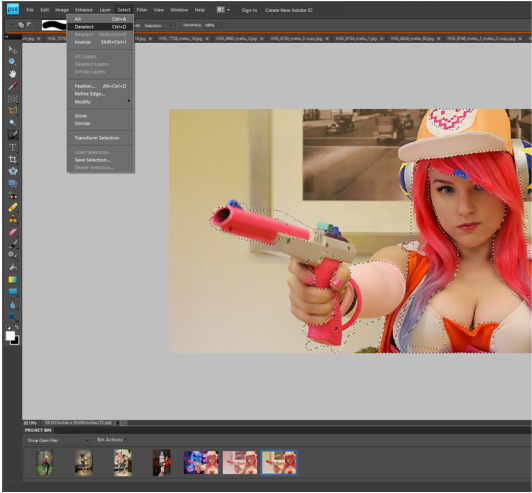 You can either go to Select --> Deselect or hit Ctrl+D. Select new areas you want to change if there are anymore. I'm selecting the skin and background. 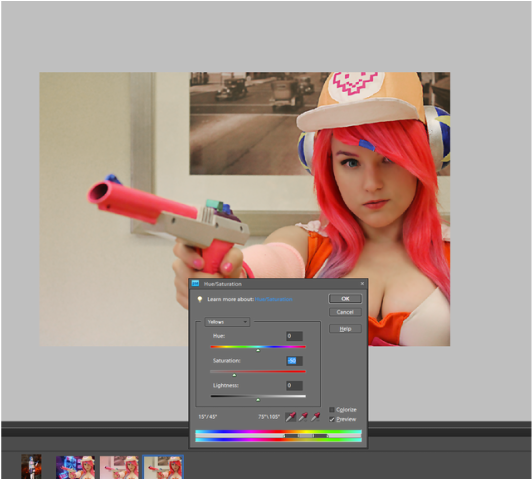 So going to the Hue/Saturation Adjustment menu, I select Yellows in the drop down menu this time. I personally like to remove the yellow tones from lighting and the skin depending on the photo. I feel it makes the photo look more clean and professional. But depending on the style of photo and editing it, yellow light can add to it. It's all preference. In order to remove the yellow tones move the Saturation (second) glider more towards the left. Once it's where you like it hit okay. 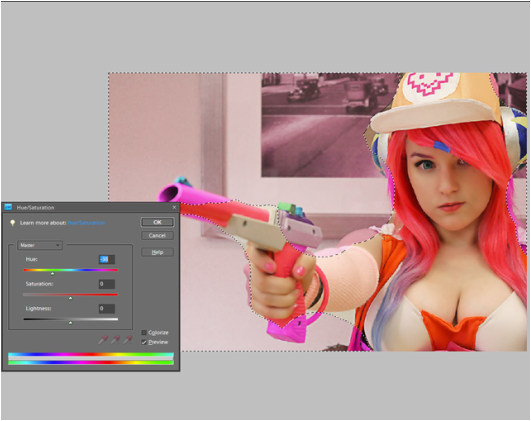 Changing colors of the background or different subjects in the photo. Note this is done sloppily, once again, because I did it quickly for screen shot purposes. Select the area you want to change the color of and open back up the Hue/Saturation window. To change the color drag the slider along the Hue bar until it's at a color you like. You can alter the darkness/brightness and saturation of the color using the other two sliders. 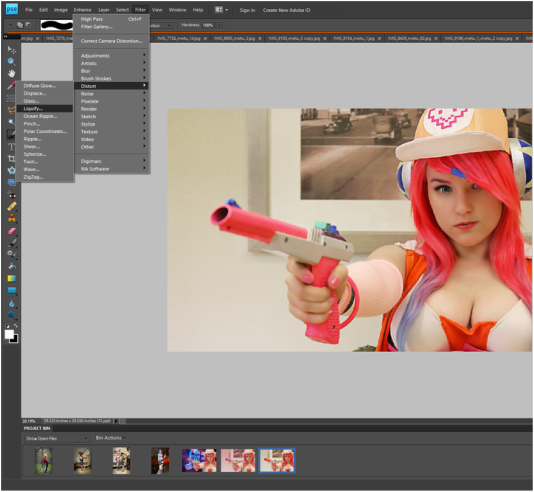 Another thing I'll often do is slightly enlarge the eyes. I like to make it more "anime-like" and other times eyes may be slightly squinted due to bright lighting or some other reason. Anyways, to enlarge eyes you can use a tool found under the liquidfy option. Filter --> Distort --> Liquidfy 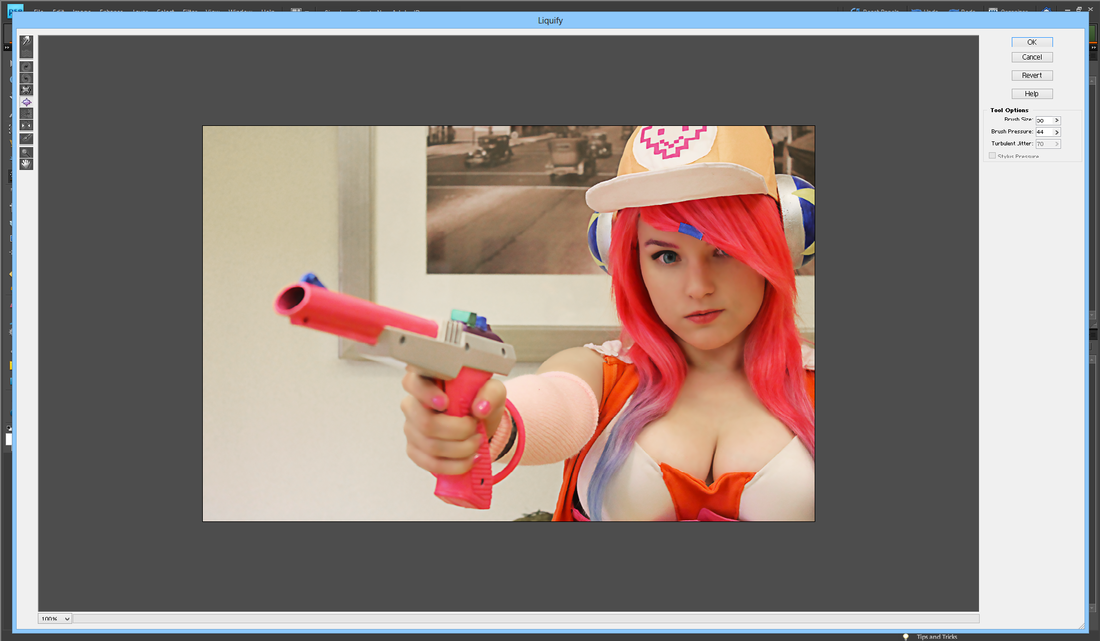 The 6th picture down or the picture of a square with an arrow on each side facing away from the square will be an enlargement tool. It should say something similar when hovered over. Set your brush to be around the size of the eye and just click once or a few times until the eyes are the size you want. I'd recommend not to over do it and to keep it as natural as possible. I like to use this as a little trick to help make the eyes pop or be slightly more fitting to the cosplay/character. 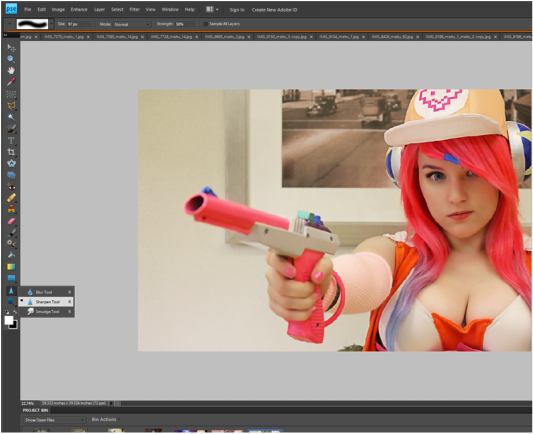 Sometime my camera won't focus quite where I want it to or a picture will be slightly blurred. Usually I find that the eyes aren't as in focus as I'd like. Click the second tool picture from the bottom. You'll find the picture is whatever tool you left off on so it can either be a tear drop, a triangle or a pointing hand. Click image and make sure it's set to the triangle/Sharpen Tool. Adjust the brush size to be around the size of the aspect you're sharpening. For example, when doing eyes I make sure the brush fits just around the entire eyes and simply click once or twice to sharpen it. When doing large object, like an entire person, I make sure the brush is a large size but doesn't fit around the entire person (since people typically aren't a circle--they have limbs and such). Then I'll click and drag the brush around/over the person I'm sharpening. I'll only have to do this once or twice. Keep in mind that if you continue to sharpen an area over and over again it'll begin to look super pixelated and you probably don't want that, this is why I recommend only going over an area once or twice. I also rarely use the sharpen tool at full strength. You'll see an option to adjust the strength in the top bar, a few slots to the right of the brush option. I usually put it anywhere from 30-75%.  I often blur backgrounds, especially if they're very busy and I feel pull focus away from the main subject (i.o. cosplayer). To do this we'll be going back to that same tool option we just found the sharpen tool under, but instead click the Blur Tool/tear drop. I recommend duplicating the layer for this and do all the blurring on the top layer. I say this because if you accidentally find you've blurred a part that you didn't want to, you'll be able to simply erase it and the original, unblurred photo will be right there underneath. You'll be constantly adjusting brush sizes during this in order to get around the different shapes just right. I usually use a large brush size for a majority of the empty space around the edges (referring to this photo^) and then switch to a brush size of 12 or less when going around or near my subject. For sharp corners, sometimes the circle shape of the brush will mean part of your subject gets blurred, this is where the eraser comes in handy (just erase the subject --or at least that part-- from the layer). I typically set the strength to 100% but depending on the look you're going for you may want to change it. Sometimes I will change the strength several times throughout the photo when I want the blurred parts to fade into an in focus part. In example, if I the subjects just sitting in the grass and I want the grass in the background blurred but not the grass towards the front. I'll change the strength several until it's around 5-10% at the last part to be blurred so everything will blend. You don't need to go down 1% at a time, towards the higher percentages I'll jump down from 10-20% at a time and towards the end 10-5% at a time. 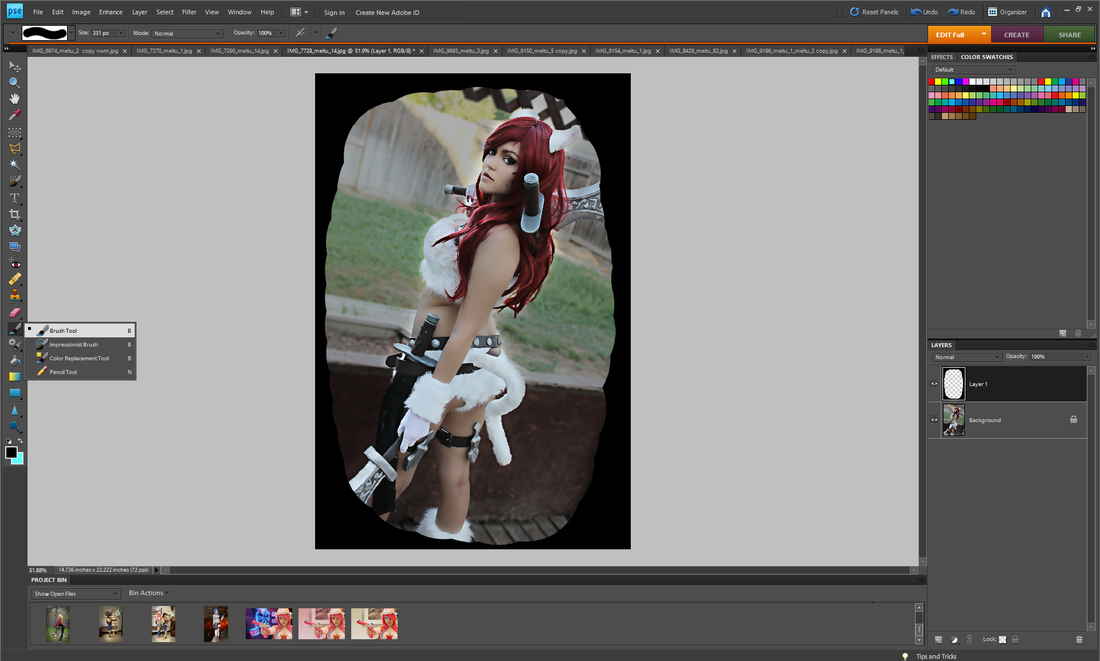 I'll sometimes add a ring of darkness/shadow around the photo or shade different areas of a photo (sometimes I'll shadow the entire background just to make the subject pop). To do this click on the tool picture where it'll either look like a pencil or paint brush. Click on the Brush Tool. Create a new blank layer (can be found at the bottom left hand corner of the layers tab/window). This is the layer you'll be working on. The size you adjust your brush to will depend on what you're shadowing and your photo, you may have to change it several times. For the color choose a black. Then color in the area you want shadowed. If you're doing the entire background leave a bit of a gap around the subject or whatever you're not shadowing. If you don't want even the slightest shadow on your subject make an even bigger gap in between the shadow and the subject then. 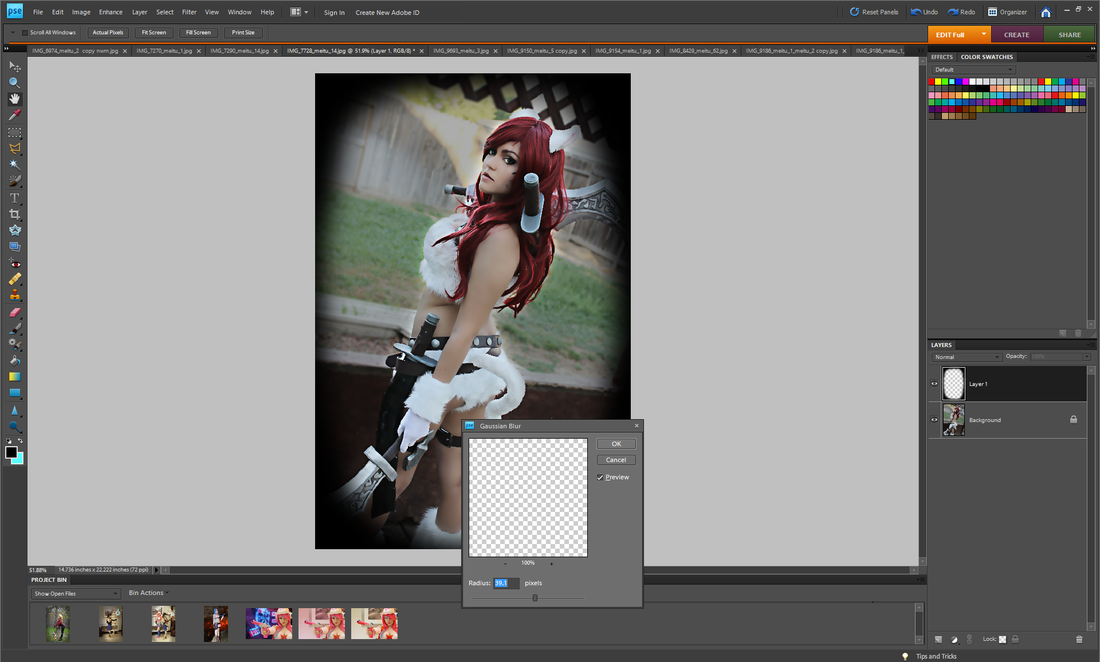 You'll want that gap because we'll be blurring the layer and depending on how much of a fade you want the shadow may get onto the subject after blurred. The more faded you want it, the bigger the gap in between the coloring and subject you'll need. You can always go back in and erase shadows off the subjects but sometimes they may leave weird harsh lines in the shadow that you may have to re-blur (either using the blur process we're going to do right now or the blur and smudge tool). So to blur the shadow and create a fade, Filter --> Blur --> Gaussian Blur Adjust the slider/percentage until you the fade/blur is to your liking. This honestly depends on preference and the photo.  Now to make the shadow more natural/less harsh or when using it just to darken a background, go over to the layer window/tab. Hit the arrow near the Opacity option and adjust the slider until it's where you like. Once again, this depends on both preference and the photo.  Sometimes I like to have more fade to a shadow than just the blur tool alone can do with one layer. So either I'll duplicate the layer we made the shadow on (before any of the blurring was done) or simply color in another shadow on a new layer. For example, if I want the very corners of the photo to stay black I'll create a new shadow layer. I'll repeat the same steps as above but change the amount/percentage I blur it at and the opacity. I usually have it so that the bottom layer has the least opacity (aka lower percentage) and is the most blurred (higher percentage), each layer above that has higher opacity (higher percentage) and less blur (lower percentage). I usually only have 2 or 3 layers of shadow if I have more than one. I'll then Ctlr+Click and select all the shadow layers and Right Click--> merge. I'll then apply a Gaussian Blur one last time to blend all the shadow layers together and adjust the opacity if needed. This is how I typically edit all my cosplay photos. I hope it's both in detailed enough and easy enough to understand. I tried my best!
~Positive outcomes only! ~ Not sure why, but I decided to make a blog post on my photographer situation. Nothing special or anything but I figured "hey maybe this'll give people some ideas on how to go about getting photos of their own cosplay (or whatever)!"
There's a couple different ways shoots can happen. You can be paid to do the shoot or pay someone to shoot it. I guess it depends on who contacts who. There's also one where it's free on both ends; the photographer takes photos therefore gaining more experience and shots for their gallery and you get photos of your cosplay ~there's an actual word for this but I forget. Most people seem to try out different photographers and usually settle with one or two or something ~do your research, don't go alone and check references. Personally, I'm not exactly sure on how these things work out, who pays who or if it's a swap/free thing. I don't work with "actual" photographers, so none of these things ever come up. How do you go about shooting cosplays if you don't work with photographers? I don't work with "actual" photographers. I just have friends take the photos! And no I don't mean, photographers who are friends or vise versa. I literally just mean I ask someone "hey will you basically be my tripod and help me take photos of my cosplay". So usually and most recently, I just ask my boyfriend. I don't call them "actual" photographers because they aren't. None of them have had an interest in photography really or are pursuing it as any type of career, the most experience they've had before is a photography class to fill an elective spot back in high school, they haven't done any photoshoot type things before this and I don't even think they own a camera ~we use my equipment for shoots. Honestly, I'm not really sure they even slightly enjoy shooting my cosplays, but they're super nice and helpful so they don't mind :) . So how do I get at least decent quality photos with people who don't know much about photography? 1. It'll be up to you to do your research! If your friend isn't interested the slightest in photography, then they'll probably look to you as to what they should be doing. So it'll be up to you to learn something about photography. -Figure out angles. Find what angles look best and flatter both you and the costume. -Poses. It won't work like a professional shoot, they wont be instructing you on what to do and where to look, in fact they'll probably be asking you where they should stand! So research your character and look up what poses fit them. -Instruct! As I was saying, your friends my be asking you where they should stand. So give them these instructions. Everyone's different though so some may go off and do their own thing, but if there are specific photos you would like at certain angles, tell them "hey also get some shots of this ___". -Take many photos! Ask your friends to snap a few photos of them same shot. This way when going through them you have a few options to choose from in case you blink in one, or don't like your expression in another, or they shot was a little blurry. -Take your time. Mention to your friend, especially if working a camera isn't their thing, that they may wanna just hold the camera still a few seconds before and after taking a photo and take slight pauses in between each snap of the camera. This is especially good advice if your equipment & setup isn't super amazing! It sucks to have a pose or photo you really like be unusable because it's too blurry. So don't try to rush through it. -Work as a team. Especially if both of you know very little and are new to photography. Work as a team, give each other input and advice and help set each other up I guess. Share ideas for poses and angles. 2. Have a good camera. Something other than your phone! If this is something you're really interested in then invest in a fancier camera. I use a Canon Rebel T3 ~which was "top of the line" at the time I bought it, just under the Canon Rebel T3i. I've also recently invested in lighting and backdrop setups -they're in the mail!- and will be getting a around 5-foot tripod. Now this is mostly for YouTube purposes but I'll be using it for other small "shoots" as well. 3. Good lighting! I try to shoot in the morning and/or mid-day and outside. Natural lighting is great and makes photos look so much better. Shoot on bright and sunny days. If you're shooting inside try and get as much natural lighting into the room as possible -if you have lighting equipment that works too. Note: Pay attention to shadows and the shadows of the photographer! Try not to have the sun directly behind you as well because that may throw off the lighting and shadow your face. What about editing? I edit all my photos. At the end of the "shoot" I just pack up my camera and stuff and later on, at home, upload them all to my computer and start going through them. This may be the tricky part about just having friends take photos. It means you'll have to learn how to edit, and if you're not super computer-savvy it may be a problem. Keep in mind photos don't NEED to be edited. It's all personal preference. I like to edit mine just because I feel like it helps give it a nice finished look. What do you do when editing? I mostly just mess with the lighting, contrast, hue and saturation. I'll also clear up blemishes and if need be change my eye color. I recently learned (and am still working on better it) glowing effects. I'll black out the background sometimes as well or shadow it over. I'll also blur the background if I feel it pulls too much focus away from the subject. I'm also working on swapping out the background (I still need a lot of work on this but there's been some photos I'm really happy with the result) and fire-y smoke effects. I use Photoshop Elements 8 by the way. For background swapping I'll use either photos I've taken or search for stock-photos (giving credit to the creator and letting them know-or follow whatever their guidelines for use were- whenever used). I've learned most of these from friends who were good with Photoshop (they draw a lot) or from tutorials online (YouTube is a great place to look!). Why don't you search for local photographers? There's a few reasons. 1. I'm incredibly weary of online people. So I'd only be willing to work with someone if they already had some sort of gallery and references to look through and contact. Of course I'd bring one or two people to come with me -so they'd need to be okay with that because I won't go alone- and I'd only really want to go if it was either at an actual business place (like how some photographers have a studio) or public (outdoors someplace like a park/forest-y area or beach or whatever's fitting -probably prefer this). 2. Playing into the weariness, social anxiety. It already takes me a LONG time to get into the zone and comfortable taking photos with just friends -my boyfriend even- that working with professionals would end in chaos -,- . In other-words, I'd be really awkward, tense, and uncomfortable working with people I barely know. Now I have done a spontaneous shoot at a convention before, so it's not like I'm never up for it -I prefer not to let anxieties stop me from living & will just bare through it xD. I guess it just makes it harder for me to actually just say "sure I'd totally love to shoot with you!" 3. Control. Control issues? Insecurities? It's just weird and out of my comfort zone to not be in control of the poses or angles or shooting, nor the photo choices and editing. If I'm being honest here, I already have an extreme distaste for my appearance, so it'd be really hard to just trust someone else to take and choose photos in which I'd actually feel I looked okay. 4. Money & Travel. I don't have the money to pay for photoshoots, and I'm not really looking into doing so any time soon. I'd much rather put my money towards bettering my cosplays and have photos taken for free by super awesome friends! And anything that requires much traveling would be difficult-once again gas fair, and I don't have a vehicle. It's not 100% out of the question though, if a really good opportunity ever presented itself then maybe. Well I hope this may have helped some of you looking to shoot some of your cosplays (or even if you're trying to get into modeling or whatever). I'm sure if you ask nicely friends would be willing to help you out and if neither of you know much about photography well then hopefully I gave you some helpful tips or ways to find more helpful tips (seriously, YouTube and Google will lead you to tutorials and forums-so helpful!). Practice makes perfect! So as you get more experience with it your photos will improve (you may even want to revisit some old cosplay and reshoot). Good luck :) ~Positive outcomes only! :) |
Arlena FaeCosplay Tutorials. Hauls & Reviews. Photography. Rambles and Advice. Categories
All
Archives
August 2018
 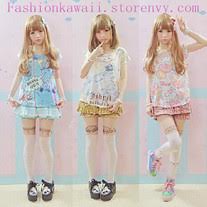
Use the code: "arlenafae" for 10% off purchases at:
http://fashionkawaii.storenvy.com/ |
 RSS Feed
