|
I get a lot of questions on where I buy certain pieces for my cosplays. "Where did you buy your wig", "Where did you find the shoes", "Do you have a link for it?". So I've decided to start compiling lists and putting together a little shopping guide to help you find the right items when creating your own cosplay! Just a quick note: I buy a lot of items of Amazon and eBay and sometimes those listings may expire. So I apologize if a listing no longer exists but both eBay and Amazon are pretty good at suggesting new listings of the exact same item! So check out whatever the recommended newer listings may be. Just pay attention to seller and item ratings and reviews! 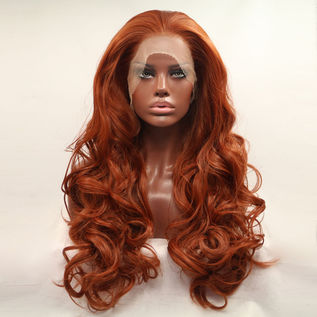 Brigitte's Wig You'll need a red lace front wig. The wig will absolutely need to be a lace front. They're more expensive but it's the only way you'll be able to customize her unique hairline! I found one for $30 on eBay! It's super thick (honestly it was almost too thick)! The perfect length (I chose the 20" option) and is a lace front! It can be styled with heat tools on a low setting like a majority of wigs and has little fall out. Here's the listing I used! 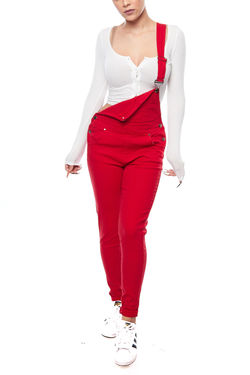 Red Overall's It was actually pretty tricky to find red, women's overalls! I don't know why it was so difficult but I eventually found one on eBay! They're most expensive than I would've liked but they were the most accurate ones I could find. Here's the listing I used!  Brigitte's Shirt I went to Redbubble to find her shirt. I knew that'd be the best place to find it. Unfortunately, the shirt with my favorite design, was way expensive when choosing the female v-neck fit. So I bought this unisex, crew-neck tee instead. It was $10 cheap and all I had to do was take in the waist a little and cut/hem the neckline. I choose the dark grey coloring. Here's the listing I used! 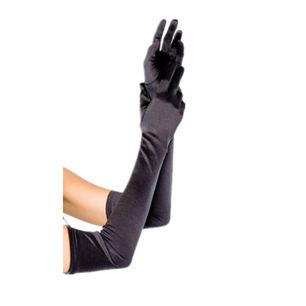 Brigitte's Gloves I already owned black gloves and silver fabric to created her gloves. I can't link you to fabric--I suggest checking your local fabric stores. Silver stretch fabric is fairly common in most fabric stores. For the black gloves though, I've linked a listing for cheap, long gloves! All you'd have to do is cut off the fingers and make them shorter (or to the length you like). Here's the listing I recommend. 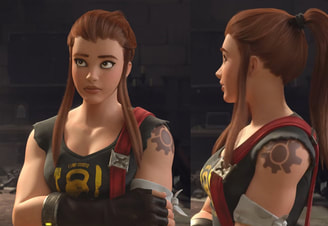 Brigitte's Tattoo I painted mine on using acrylic paint but this can be extremely difficult and messy (especially if you do it by yourself). I recommend finding a listing for a fake tattoo instead! There's lots of companies out there that do cu5stom fake tattoos but I always go to Etsy for things like this. I've linked a few different listings that look pretty good! Recommended listing #1 Recommended listing #2 Recommended Listing #3 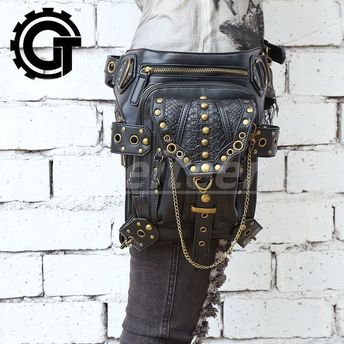 Brigitte's Side Bag I bought a hip/waist bag a few years back, so the exact listing I used isn't up any longer. But I found a similar one. These are quite expensive though and her's isn't anything fancy. You could easily get the look with just a normal, black fanny pack. I've linked a listing to the exact one I used, a mid-range priced one and a couple cheaper options. The one I used Mid-Range priced option Cheaper option #1 Cheaper Option #2 Everything else for this cosplay I already owned or made specifically for this cosplay. I used a pair of grey boots I've had for several years now and made the small details to add onto her fanny pack, overalls, etc.
I hope this shopping guide has helped you find some of the items you may be searching for! ~Positive Outcomes Only~
7 Comments
2017 has come and gone and I'm going to do a recap of the cosplays I was able to create over the year! There's a lot of little fun facts and snippets of info about the cosplays I've created so keep reading~  Li Ming from Heroes of the Storm This was my first costume of 2017! I completed her for a convention at the beginning of the year. Overall, I was so happy with how this costume turned out. This was my first time using orbs and the fabric-covered foam technique to create the edging. The sewing wasn't as clean as I'd like it to be due to my sewing machine not enjoying sewing over foam, but from the outside it looks fine! View the gallery here!  Bunny Tracer from Overwatch I found this costume for about $5 on eBay and it perfectly matched the fan art I saw of Overwatch Bunny girls. This was definitely a zero-effort cosplay. I only threw this together because I found the costume for cheap. View the gallery here! 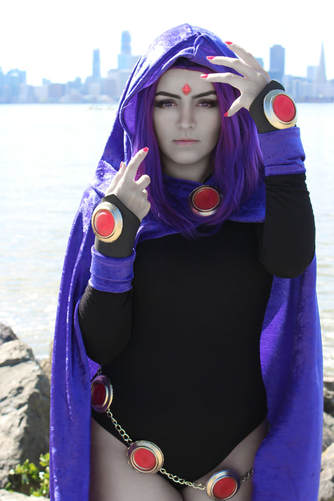 Raven from Teen Titans Raven was a costume I had all the materials for, for the longest time. It just took me forever to get around to making her but I did it! The belt is made from soda can bottoms and filled in with resin gems. I don't really like these gems anymore and have since found a better way to cast them. View the gallery here! 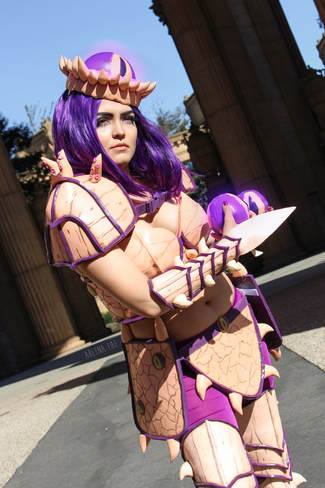 C'thun from Hearthstone I created this armor design myself! I had this costume planned for the longest time but kept it secret. Only my patrons saw the design and knew I was working on it. The C'thun-focused set hadn't been out for too long when I first started working on this, and since I actually played Hearthstone fairly often then, C'thun was my favorite card! Hence the reason I decided to cosplay him. View the gallery here! 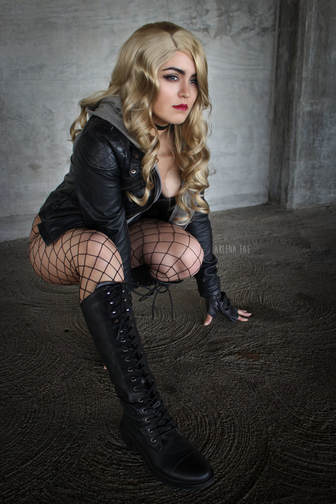 Black Canary from DC Comics This cosplay happened mostly because I realized I owned basically everything to create this cosplay! The wig was a gift from my Reddit secret Santa the previous year~ I think it made such a great wig for her! View the gallery here! 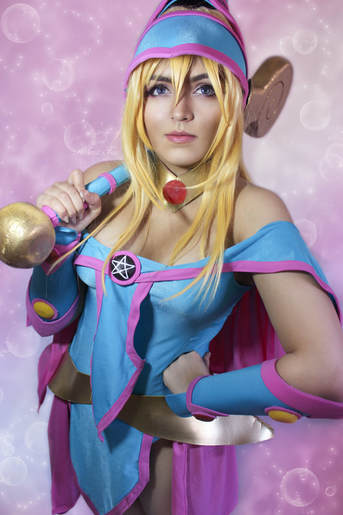 Dark Magician Girl from Yugioh Dark Magician Girl was my favorite Yugioh card! She's been a cosplay goal since day 1 and I finally got around to cosplaying her! This costume involved a lot of fabric-covered foam and was my first time having to make such a giant hat! That's actually what kept me putting off this cosplay for a while--I wasn't sure how to tackle it in my earlier cosplay days. View the gallery here! 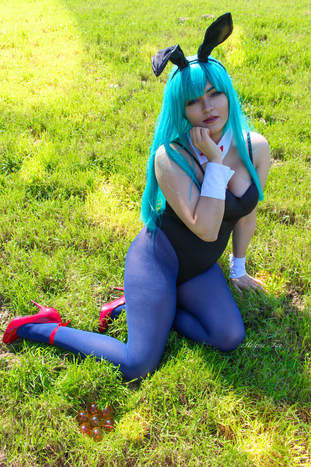 Bunny Bulma from Dragon Ball This is the reason I had the bodysuit laying around to use for Canary--I originally purchased it to cosplay bunny Bulma. This was another fun, simple cosplay I had wanted to get around to for a while. View the gallery here! 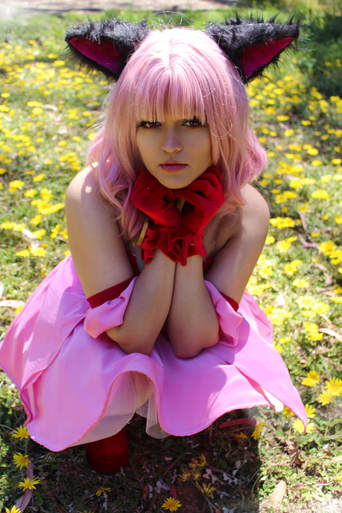 Ichigo from Tokyo Mew Mew I was OBSESSED with this show when I was little and Ichigo was always my favorite. She's another costume that had been on my list from day 1. She's also the reason I did some gymnastics when I was little--if you watched the show you know the episode. This costume was the first time I used horse-hair braid and I'm thrilled with the results. I love wearing this cosplay because the skirt is so poofy! View the gallery here! 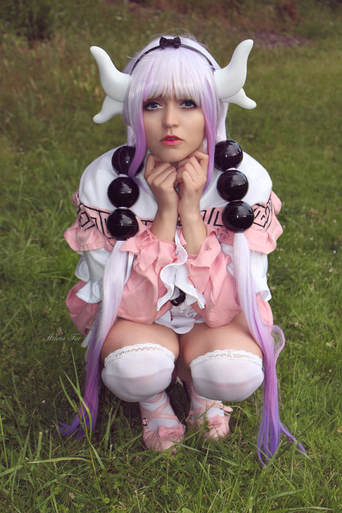 Kanna from Kobayashi's Dragon Maid I began working on this cosplay as soon as I saw the anime. Kanna is just the most adorable character and I just had to cosplay her! I debuted this cosplay at Fanime and loved wearing it so much I wore her for 2 days of the event. View the gallery here! 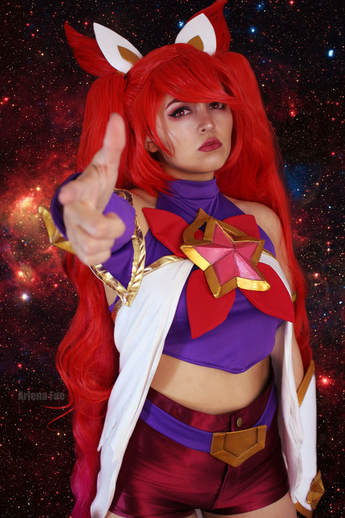 Star Guardian Jinx from League of Legends I had been wanting to do this cosplay but didn't know when I wanted to get around to it. The opportunity arose when a friend made a post looking for someone to be Jinx for her Star Guardian group at Fanime. Being in a full Star Guardian group was so awesome! While I'm happy with the result and LOVE cosplaying this, I have a love-hate relationship with this cosplay. Since I started late, I just did not have the time to complete it to my liking my first go-around. It was incredibly stressful and I had to paint on the drive to the con-which got me car sick! View the gallery here!  Augmented Sombra from Overwatch This was my bigger project for the first half of the year. So much lighting was involved and this was the first time I really gave wig-styling a go and put a lot of effort into it (which I need to do more). I'm pretty happy with the result! View the gallery here! 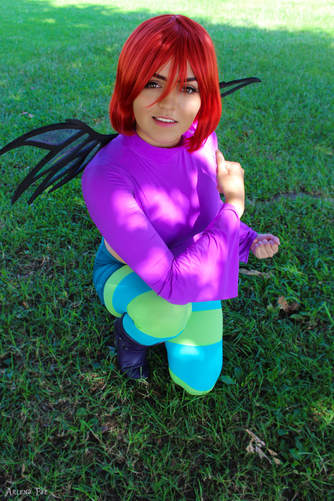 Will from W.I.T.C.H. W.I.T.C.H. was another show I was OBSESSED with when I was little and Will was my favorite. I actually bought a huge frog plushie because of her--there was a mini comic from McDonalds that included this photo. I also wanted to dye my hair red (which didn't happen) and got a hair cut to match hers. I found these fabrics when shopping with a friend and they were too perfect. The fabric choice is one of my favorite parts about this cosplay. Gallery coming soon!  Asuka from Neon Genesis This version of Asuka was one of my first cosplays, back before I actually started to really cosplay/cosplay regularly. Since it was done so poorly the first go around and I had no photos, I decided to revisit it! I searched high and low to find a location with tall yellow grass and am so happy with the place I found. This was literally a dream location/shoot come true! View the gallery here!  Yurio from Yuri on Ice I was fairly late to get on board the Yuri on Ice train. But when I did finally get around to watching it I absolutely loved it! I see why it was so popular. Yurio was immediately my favorite character so I just had to cosplay him! Gallery coming soon!  Ziggs from League of Legends This particular fan-art/design of a female Ziggs had been on my "to cosplay list" since day 1. I just think it's so cute! I'm glad I finally got around to it. I'm super proud of this costume because it's fairly travel-friendly and I just love the coloring and how "clean" everything turned out. Gallery coming soon! 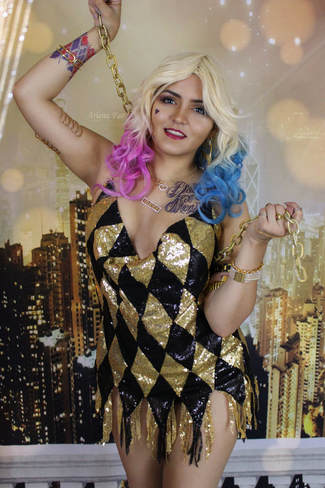 Harley Quinn from Sucide Squad This outfit had been on my list since I saw the move. I loved the look of the dress so much--I like shiny things, okay. I had put it off for a while because the sequins, diamond pattern and fact it required draping intimidated me. I finally decided to tackle it, learned some new things and am happy with the outcome. View the gallery here! 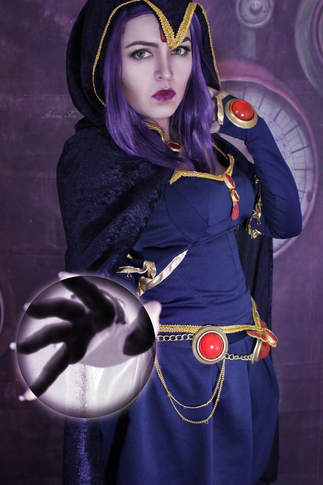 NoFlutter's Raven Design I love all of NoFlutter's design. They're, like, all on my "to cosplay" list. Raven was the first one I decided to tackle. I'm so happy with my construction on this! I had to pattern so much from scratch and had to add so much detailing. I actually found adding all the small details a lot of fun and can't wait to tackle more detailed projects in the future. Gallery coming soon! 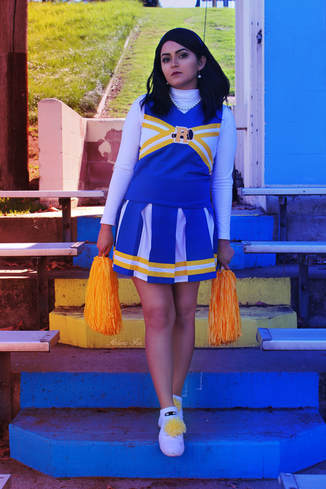 Veronica Lodge from Riverdale I'm obsessed with Riverdale. Everything about the show is amazing. I especially love the aesthetic. I just had to cosplay a character from the show! And while I love so many characters, I eventually decided to cosplay Veronica--especially because I look most like her and felt I could pull her off better than Betty or Cheryl. Gallery coming soon! 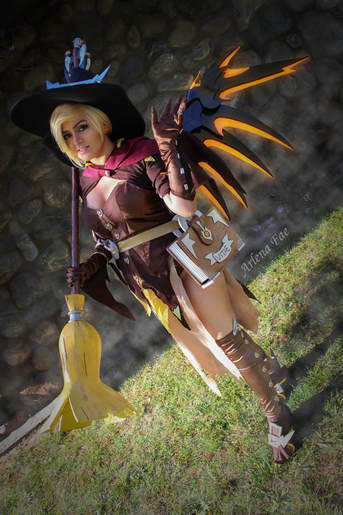 Witch Mercy from Overwatch This was one of my bigger projects for the end of the year and definitely a challenge. Everything had to be travel-friendly and it was my first time making wings like this and using clay to model the broom stick. Her corset is also an odd pattern and was a challenge to pattern/sew. I'm glad I did it though! Gallery coming soon!  Yumi from Code Lyoko Yumi is another one of the cosplays that happened because I realized I owned literally everything to make this cosplay! Code Lyoko was another show I loved watching when I was younger, as well. Gallery coming soon! 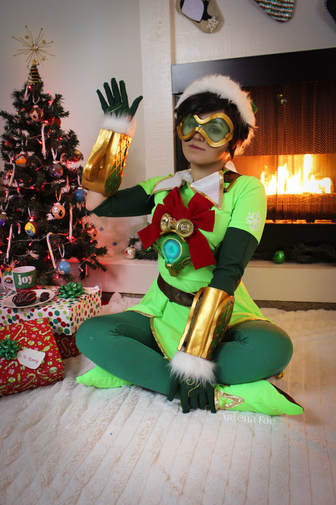 Jingle Tracer from Overwatch This was my last semi-big project of the year. I was able to get this together fairly quickly and am so happy I did this cosplay! Blizzard/Overwatch ended up sharing my cosplay which was so cool and had me freaking out for a bit. I also made my first every music video/parody which I never thought I'd do, but this was just the perfect opportunity. View the gallery here! 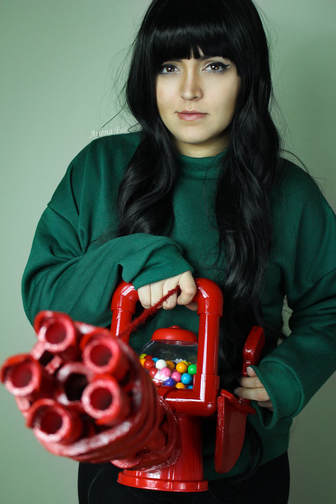 Numbuh 3 from Code Name: Kids Next Door Numbuh 3 was my last cosplay of the year! This is another cosplay that happened because 1. I loved the show when I was younger and 2. I realized I owned a lot of the pieces to make this cosplay happen. This is definitely not my best prop but hey, it was an excuse to buy a bubble gum machine--which was something I wanted when I was younger. So yay! Bubble gum! Gallery coming soon! And that wraps up my 2017 cosplays! I can't wait to see what I'm able to do in 2018 and what skills I'll improve and new ones I'll learn.
None of these would've been possible without the support I receive on Patreon. I would never be able to complete this many costumes in one year, let alone costumes is large. I try my hardest to make sure my Patreon is worth every penny and provide TONS of various, valuable content. My Patreon isn't just some random donation place where you're money is thrown into the abyss. It's an actual transaction, as silly as it sounds, you're paying me to create content--whether it be photos, tutorials, patterns, etc--for you! All of it goes straight back into creating cosplay and educational content around it~ If you'd like to be apart of my cosplay creations in 2018 become a patron! A dollar a month gets you access to a lot of content and goes a long way! If the idea of a monthly pledge puts you off but you'd still like to contribute, I do have a Ko-Fi where you can make small, one-time donations (the amount a coffee costs) that I'll put towards cosplay. And if you want to make a pledge of something different than the Ko-Fi amount I have "donation" buttons around my site or you can use this link. If you'd rather get a "psychical good" my Storenvy has a ton of patterns, prints and small cosplay accessories to choose from! Don't have the funds to spare? I totally get that! And it's no problem! I don't value your support any less! I appreciate all and any support I receive. It means the world to me that people enjoy my cosplays so much. I love being able to do what I love, share that with others, have others love it to and then help them in creating cosplays of characters they love! Plus there's other super helpful ways to support me with no cost! Every comment and like/interaction with my posts on any or all platforms does a ton! Right now platforms are working against creators and suppressing their content. Your likes and especially comments/shares on posts does a ton to help our content reach others! Most platforms work like this: platforms only show post to a small portion (like 5-10%) of your followers, the more engagement (with comments/shares being the most valuable) a post gets the more followers it'll start to show your post to and on Instagram, the better shot it has at reaching the explore page. See? Just your internet-based support does so much to enable your favorite content creators to keep making content! One of the best way to support your creators is to turn on notifications about posts and actively interact with those posts! Sorry if that sounds "beggy" but in order to grow platforms like Patreon, Storenvy or Ko-Fi (which fund my cosplaying) ya gotta talk about it you know? And I feel it's good to raise awareness to how algorithms work and how anti-creator platforms have become, just in case you want to do more to support the creators you love. I know I love doing what I can to support creators and fellow cosplayers who's content I enjoy. And while I don't have the money to pledge to every Patreon, I do try to actively engage with their content and grab prints from them when I've got the spare funds! I hope to see them grow and that much success comes their way in the new year! Again, thanks so much for all the incredible support I received in 2017 (financial or not). You all make cosplaying so much more worth it! I hope I'm able to provide just as much (or even more) quality and helpful content in the new year and that you all stick around for it! Hope 2018 brings everyone a lot of success and happiness as well! ~Positive Outcomes Only~ Exciting News!You've all be invited to join the Faerie Family's club! What!? A club where anyone can join?! Yep! That's right. So what is the Faerie Family Club?Well it's an email newsletter. That doesn't sound as cool as a club, though. But wait! Let me explain. Just because "newsletter" isn't as cool as a club, it doesn't mean that it's not cool at all! This newsletter is still pretty cool (if I say so myself). This newsletter is sent out at the end of each month! It's designed to keep you in the know~ You'll be filled in on everything I've done the past month in case you missed posts or announcements on social media and receive cool little bonus goodies! Let's break it down. Each month you can expect:
What's the catch?There is none! Subscribing to the Faerie Family newsletter is completely free, no strings attach. It's simply another way for me to thank my awesome supporters like you, all while keeping you in the loop--this way you never miss an update! Where do I sign up?!Just fill out the super-short "forum" below! It's as simple as that. Then you can expect your first newsletter at the end of the month! Exciting right? If you ever find yourself wanting to leave the club, just reply "stop" to the next newsletter and you'll no longer receive anymore updates (this instruction will occur at the end of each newsletters-so no worries if you forget how).
A bit sad. But no worries! You can always re-subscribe up in the future! Recently read something that caught my interest. There was an article where a comment was made about how "lazy" a certain cosplayer's gijinka design was. The author's solution? They suggested "just make a catsuit"... Now I don't think a catsuit would make a "bad" cosplay (I don't think there's such a thing as a "bad" cosplay, in general). A catsuit could be great, amazing and creative! That's not the problem. To compare that idea, in such a negative way, to one who simply looked at it a different way was a little... ignorant. Part of the fun in designing a gijinka cosplay is how creative you can be! There's so many different aspects to take into account that can go a lot farther than just the physical shapes and colors. There's no limit to what one can do because it's your very own design! If you aren't sure what I'm talking about and looking to add even more into your gijinka design or if there isn't too much there for you to go off of to start with, then this post may be what you need! What Are You Cosplaying?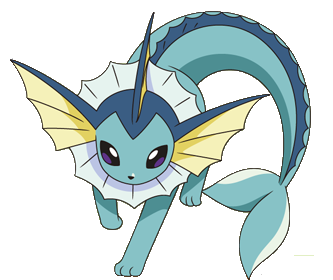 So lets start! Since it's probably some of the most common characters that have a gijinka designed for them, we'll be using Pokemon for this example! Okay, so we've decide what we're going to cosplay and it's a Pokemon! More specifically, let's say it's Vaporeon (at least for these next few examples). I know, this was a very basic step. Not much more to say, just needed this covered to move on. What Does The Character Look Like?Let's take a look at Vaporeon. It's yellow, white and two shades of blue in color. There's three "ears" on it's head, a collar around it's neck, it has a mermaid-like tail and scale/fin-like detail that go all the way down the back. It's skin/texture also appears smooth. So what can we do with this information? Well, just by looking at it we can already decide on what our color choices should be for the materials (whether it be paint or fabric); blues, yellow and white. We can also decide on the texture (if you're not going for an armored version--that usually changes things up a bit, but we'll touch more on this later); smooth. We also know we should probably include some key details like the ears and collar piece. The webbed shaping of the fins, collar, and ears is pretty significant too. We can make this will be a reoccurring shape throughout the outfit. Where Do They Live?This is very important! The area in which they live can definitely help you figure out what kind of design/style to go for. If they live in a hot, sunny dry area, you'd typically want to design something meant for that climate. If they live in a cold, snowy area you'd probably be looking towards designing something warm maybe with a lot of fur or layers. What about a desert? Or specific region of the world? Is there any sort of traditional clothing or style common to that area in real life? What about the time period? What would people where in those days? These are all things to consider! Vaporeon lives in the water, so going for something with a water vibe--whether it be mermaid themed or pool party themed-- is a pretty fitting idea. The Pokedex entry also mentions it prefers beautiful shores. That can make the idea of designing something with a little bit more elegance and very detailed pop into our head! What Are Some Key Aspects?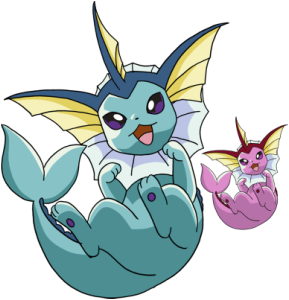 What stands out about the character--more than just appearance? For Pokemon we can instantly jump to their typing, the moves/abilities they have, and other information easily found in the Pokedex in games (or Wikipedia pages). So for Vaporeon, we know it's a water-type, it learns a majority of water-type moves, and it evolves from Eevee. The Pokedex entry also mentions that it's molecules are similar to water (it can even melt into it) and that it's tail is often mistaken for that of a mermaid's. So from this we can decide to lean towards a water-fitting design. Maybe something mermaid inspired or maybe some sort of bathing suit--made with water friendly materials. The fact that it's molecules are similar to water can bring about the idea to use fabric that moves and even sort of looks like water. You could also go about this a completely different way. You could decide to play more into the fact there's multiple Eeveelutions and make one uniformed design with slight tweaks for each individual characters. This could completely change your choice of fabric and if they environment/typing is important to consider or not. What About Personality?Personality is an important aspect! How does the character behave? Are they a bad-ass and edgy? Shy? Super serious? Young and playful? Seductive? Depressed and sad? Happy and motherly? If a character is childish and playful then it's probably a good idea to go with something youthful and easy to move in. If they're edgy and dark then maybe it's fitting to stay away from too many bright colors, throw in some spikes and a biker jacket? If they're motherly, think about what a mom would wear--maybe a classic 50's portrayal of one? Now Pokemon may be a little tricky. But if you watch the show or check the Pokedex entry you can sometimes find some information about their personalities. If they don't mention that then go with what you feel. I've personally always felt like I could do something glamorous and elegant mermaid-wise or something fun and playful for Vaporeon. What Do They Do?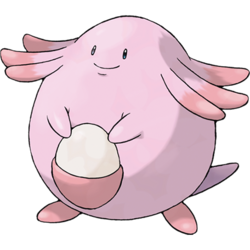 What does your character do? Do they have a job? What about hobbies? If they like to cook, how about adding some sort of apron to the design or chef inspired outfit? Do they play sports? What kind? Maybe you can do some sort of sports attire fitting to them? I know for Pokemon this can seem a bit irrelevant. For most gijinka designs this can be difficult to think about. After all, gijinka designs aren't inspired by humans... or at the very least, they don't always have human-like traits (such as jobs and hobbies). So instead think about it in a different way. If they were human what would they do? What do you think their job would be? Would they have any hobbies? Do you see them playing any sports? Their owners/trainers, what are they like? What do they do? Does the Pokemon get along with their trainer? Are they similar? If so, you can probably bet they'd be doing the same things as their trainer if they were human. Is their trainer more like a mother to them? Like how Misty is to Togepi! We could easily make a Togepi design inspired by children wear or something youthful. You can get fairly creative here! For Vaporeon, mostly because of the water aspect, I can see it being a swimmer. Maybe a mermaid--I know not fully human but close. Maybe some sort of royalty?! For a Pokemon like Chansey we could probably go with something motherly! Chansey is usually in the Pokemon Center in the cartoon, so if Chansey was a person we could only assume it'd be a nurse, doctor or some sort of caretaker. Something that comes off as warm, caring and welcoming, probably modest and mature, seems fitting. Obviously a nurse or doctor inspired outfit would be great!  Putting It All Together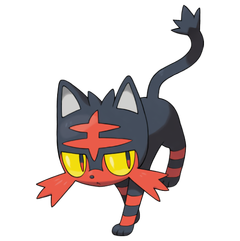 At this point, you collect all the research you've done, taken into consideration many different aspects and now it's time to piece it all together. So for Vaporeon we know we want something water-friendly or water-themed. We probably want to use smooth or flowy fabric (most likely bathing suit material), maybe a mix of both. We also want to keep significant details, like the ears and collar. At this point we could come up with a few designs. There's the option of doing something mermaid-y. Add many elaborate details, use light-weight fabrics that could be airy and flowy in water, and give it a mermaid gown shape to it (if not a full on tail). Or we could do a bathing suit. Something fun and cutesy with extra shapes added on and hems cut to match the shapes of the fins. Now it's just up to you to decide and give it your own personal touch! I think the design above (by hokoricupcake on DeviantArt) is a great mix of both! I want to use two examples for this. I've touched on Vaporeon but now I want to do an overall look at another Pokemon. So let's use Litten. Looking at Litten we know it's a cat-inspired Pokemon. It already looks a bit sassy just by design (also cats are typically full of sass, lets be real here). The colors we'll be sticking to are red and black and there's a significant marking on it's forehead. The cheeks/whiskers, tufts of hair on it's head, tail end and stripes on it's legs can also be taken into consideration. From looking at the colors, I instantly go to something edgy, punk-ish and rocker. Red and black are a common combo seen in punk/rock outfits and styles. I feel for a cat this is also fairly fitting. We could also take into consideration other cat-themed characters, such as Catwoman. It's common to see cat-themed characters portrayed as sexy and a villain, so creating this sexy, bad-ass design is another path we can take. It's also a fire type! With fire I usually go with something, well, fire-y (spicy, edgy, sexy, etc--can all be fitting options). I feel Jessica Nigri and Danielle Beaulieu did fairly decent takes on this! But don't worry. If that's not you're style you can definitely go with something else! It is a starter Pokemon, so another option could be something spunky, young and playful. Or even a catsuit can work! Throw in the colors you need, add little touches and bam!
Armor and Other Themed-Designs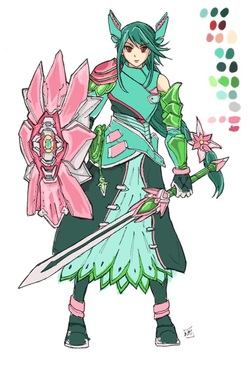 Okay so this is where things really change up! If you're doing an armored design, or something glamour inspired (like a red-carpet gown), pool party themed or even PJ themed, it'll be a lot different. You don't have to consider as much. When you have a bigger theme to stick to then all you really have to take into consideration is the colors and signature markings or details. Take this Venusaur design (by bulletproofturtleman on DeviantArt). You can see the Venusaur in it and at the same time it still may be something different then what you were originally thinking was fitting for Venusaur. It has all of the colors, the designer changed the signature flower on the back to a weapon/shield so it's still included in the design, and they also threw in other flower aspects--keeping true to it's design as well as considering the fact that it's a grass-type. While it may not be a soft or hard of a design as you'd think when thinking of Venusaur, it still represents the Pokemon well. It's taking classic armor pieces and modding them to fit a Pokemon. There's many people who take inspiration from various World of Warcraft sets, for example. They use those sets as a sort of starting point and then change and recolor pieces as needed--adding on details and removing others, changing shapes of the edges, etc--to make it better represent a different character. My point is, you don't always have to take into consideration every last details. You can pay more attention to some details than others. It's all about what you feel would fit your design the best. The only thing that may be really important to keep are some signature aspects the character is know for (for animal-like character it's typically the ears, tail and/or the texture of it's fur/skin and maybe the pattern of it). And even then you don't absolutely have to if you don't want to. There's many ways to incorporate these different aspects. I feel the various things mention will help anyone who's stuck or doesn't know where to begin. If you just can't get a good idea start looking more into the character, research different aspects of their environment or personality or pick an outside theme (like armor or glamour) and design towards that.
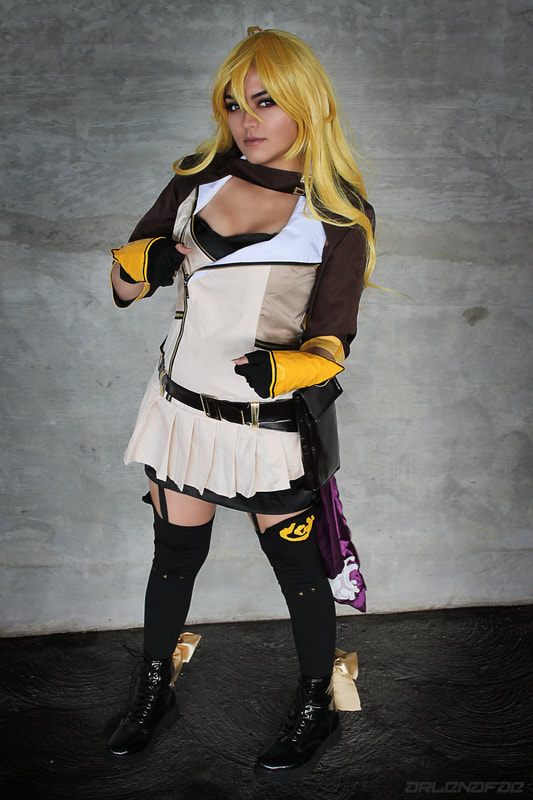
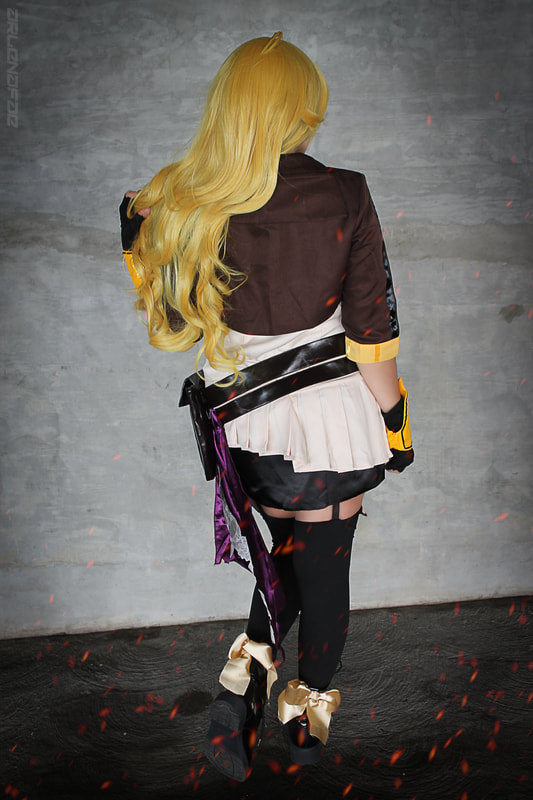
Ultimately it's up to the you to decide what you feel is fitting and it shouldn't really matter what anyone else thinks--cosplay is for fun and as long as you're having fun, that's all that matters! So just enjoy yourself, design a billion different designs before picking one, explore your talents and tastes--just have fun and love what you're doing. And to anyone who doesn't like it... well, then you can make it yourself, the way you want it done and just leave the other cosplayer be--because obviously they're happy with their design and there's no reason they shouldn't be. Happy cosplaying! ~Positive Outcomes Only~ I received a Yang cosplay from Miccostumes. This is her Season 2/Alternate outfit--and personally my favorite outfit of hers! If you don't know Yang is a character from Roosterteeth's animated series, RWBY.
Overall, I'm very a happy with this cosplay. I ordered it in a size medium, following the sizing chart located on their website. I only had very minor issues with the fit, mostly with the two dress pieces around the waist area. While I believe it's meant to be more loose fitting around the waist design wise, I'd personally prefer it to be a little more snug. this was an easy fix though! It's easy to tailor or simply pin. Both dresses are lines so it makes it easy to hide any safety pins that may be needed. It's also a bit long for someone as short as me (I'm 5 foot), but after some adjusting I was able to make it sit how I wanted.  Quick note: please forgive the lighting/color in the close up/individual photos of the product. The lighting in the professional full cosplay photos (where I am wearing the cosplay) is true to color. This is the top dress layer. It has a button that attached to one side, underneath of the top flap, and then zips up on the underside. The material is good quality, a perfect color and sturdy. The sturdiness/stiffness of the fabric gives it a good shape and helps hold the correct shape (especially around the collar). The bottom of the dress is cut at a slant, so it's true to Yang's design. The fit for this dress was slightly off, as I mentioned early. While I think it's intended to be slightly loose, I would have preferred it to be more snug around the waist. But it was an easy fix. The only other problem that occurred is due to the fact I have a very short distance between my chest and my shoulders, so the neck area is slightly long but was fixed by pulling it a little more snug near the bottom of the arm hole.  The black dress also had some slight fit issues. Once again it was mostly around the waist and slightly around the bust. And again, this was easily fixed and nothing too drastic. Most of it is hidden under the top dress anyways, so it's easy to adjust as needed and not worry about anything (like pins) being seen. The dress has a slight tendency to slip down but came with small tags where bra straps could easily be attached. I personally used safety pints and pinned it to my bra underneath. The dress is lined, so like the above dress, it's really easy to hide pins. The dress is made from silk-like materials, which I find fitting and appropriate for the design. The dress has a invisible zipper on the side. The only thing odd about the zipper is is doesn't go all the way up (with how it's sewn in/placed)--it only opens at the waist, not the bust. Instead of pulling it up and over my hips, I had to maneuver it over my head--which was a bit tricky at first.  The jacket fit perfectly! I had no issues with the fit for the jacket. The jacket is cropped to the perfect length and true to character. I'm also incredible happy with the fabric choices! The color is great and the fabric is sturdy. They even made the collar thicker and stiffer so it stayed up, wasn't floppy and held it's shape when worn. The shoulders also have small shoulder pads inside them to keep it's military styled shape/design. I'm so incredibly happy with those little details. They really make a huge difference in costume quality! The strap across the chest is attached by a strip of Velcro and holds well. I had no problems with it coming open no matter how I moved or posed. The sleeves are also a good length and end around my elbows just like in the character design. The jacket is lined as well! 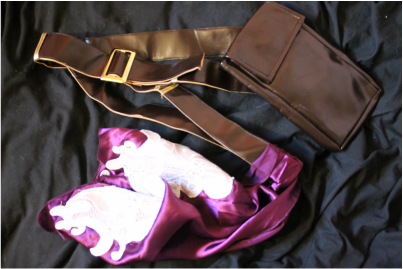 This is the belt, pouch and fabric piece for her costume. It was made from a thick material that has a fake-leathery look to it. The belt is very adjustable and could easily fit various sizes! The pouch is lined and latches by a strip of Velcro. It easily held my phone and a small wallet without feeling weighed down or causing the belt to slide or shift. I was very happy with that! It makes the cosplay very convention friendly--it's always nice to have a cosplay that has some sort of purse or pockets at a convention! 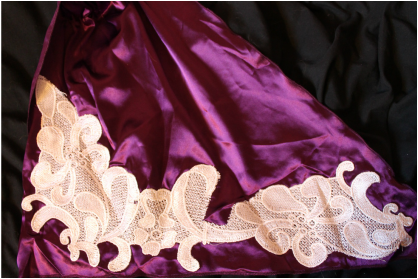 I was also very happy with the fabric piece that hangs from her belt! I loved the fabric choice and color. I thought it was perfect for the cosplay! The lace piece sewn along the bottom is great, as well. It's thicker than the purple fabric and helps hold a nice shape. Instead of it possibly bunching up into an unrecognizable blob, the thick lace helps keeps it from doing that. It's also sewn looped around the belt so it's adjustable and you have the choice to bunch it tighter or looser, as well as preposition it to where you prefer.  The decal on the stockings is a separate sewn on piece. I'm so happy with that. If it wear painted on it would risk scratching, flaking or simply wearing off over time. But the fact that it's another piece of fabric, I don't have to worry about that. The studs on the stockings seem secure and are placed perfectly. Even the shape/cut along the top of the stockings is true to character! The stockings had a bit of a fit issue. Because of my short height, they were fairly long and the gather straps/elastic bands were a bit loose in the front. Since she wears boots, my fit was to just scrunch the socks down a bit, to keep them from going up too high on my legs and have a bit of leg showing between the dress and the stockings. Doing this also got the elastic bands to fit tighter. I found the elastic bands/garter straps to be a lot better than other's I've encountered in the past. I was able to move, pose and sit comfortable without having to adjust anything or worrying that they would break, rip or snap off.  The gloves are made from the same fabric as the stockings which I appreciate. I love consistency throughout costumes. They're also a great length and cut correctly so the design is true to character!  The cosplay came with fabric versions of her gauntlets (when not "activated"). I found these just adorable and actually pretty great. The fabric used created a plastic-y, metal look which I feel is fitting for the weapon design. It's also double layers so it keeps it's shape fairly easy and doesn't flop around. If you want the "activated" gauntlets, they do sell them on their site! 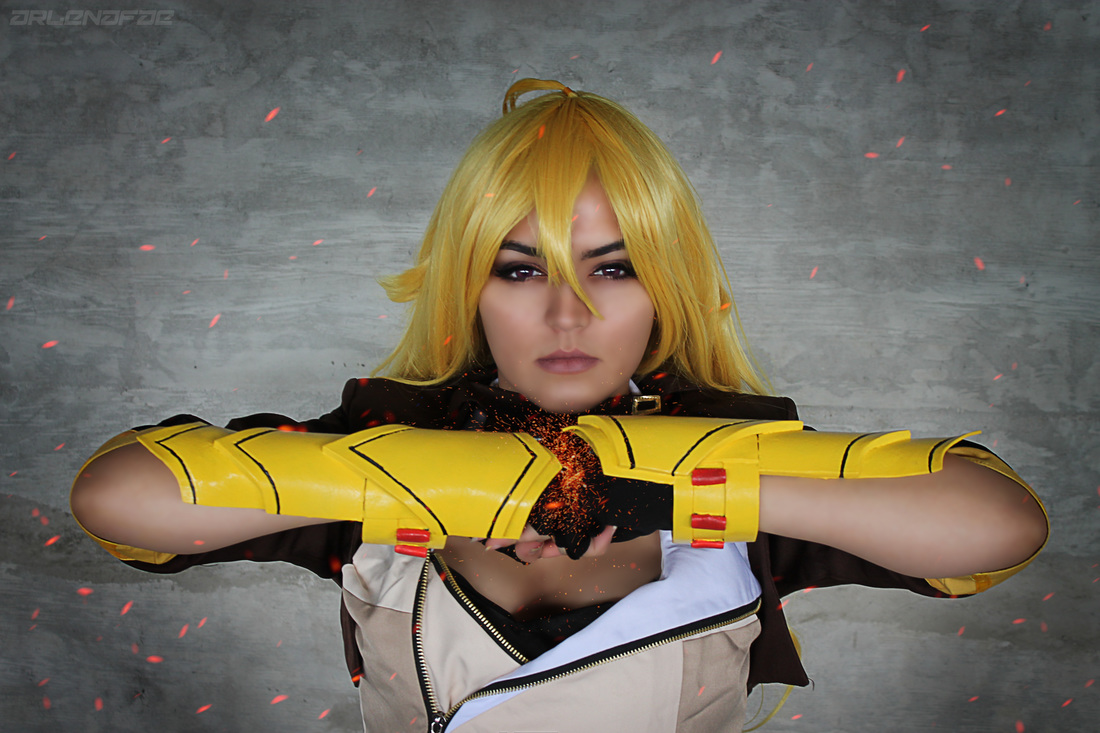 Miccostumes is a really great company to work with and order from. Their prices are extremely reasonable, even pretty cheap, for the high quality costumes you'd be receiving! They also offer bundle deals which allow you to get more for a lower cost than you would buying all the pieces individually. They sell the costumes, props and wigs for a majority of their cosplays! Their shipping takes about the time you'd expect a costume to take and even gives you an option to put in a preferred arrival date. Thanks again to Miccostumes for sponsoring this cosplay! If you're looking for a costume I definitely recommend checking out their site! ~Positive Outcomes Only~ 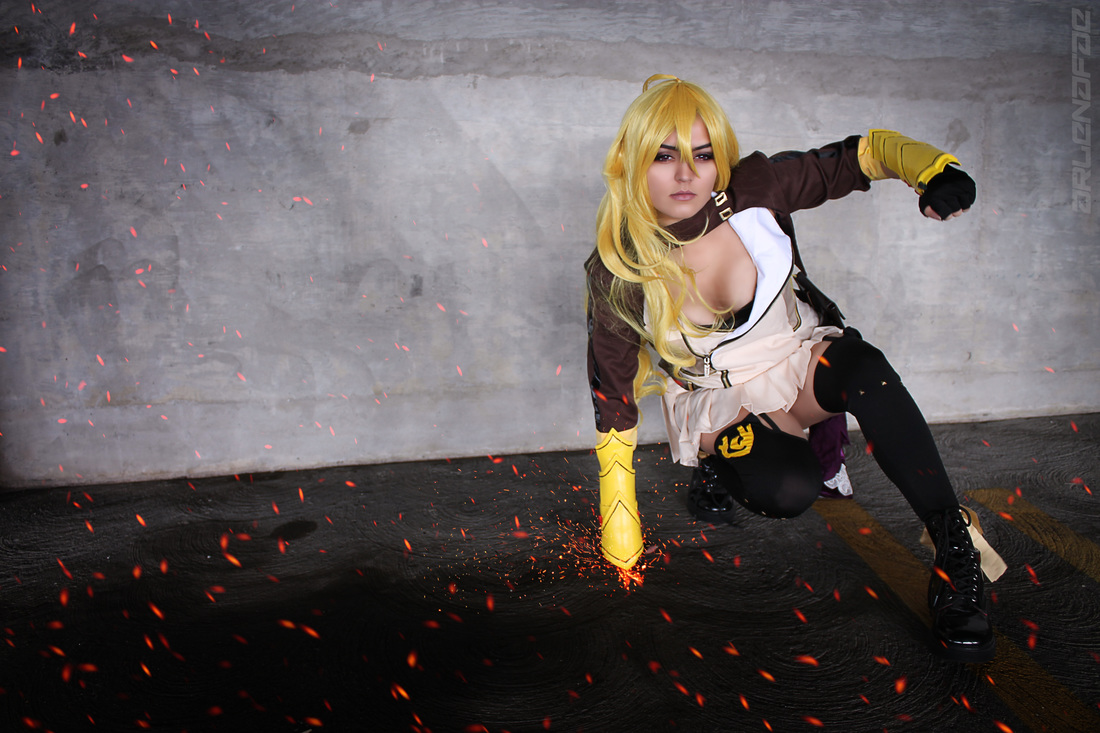 Sharing one of the ways I make some of my patterns for my cosplays! :) 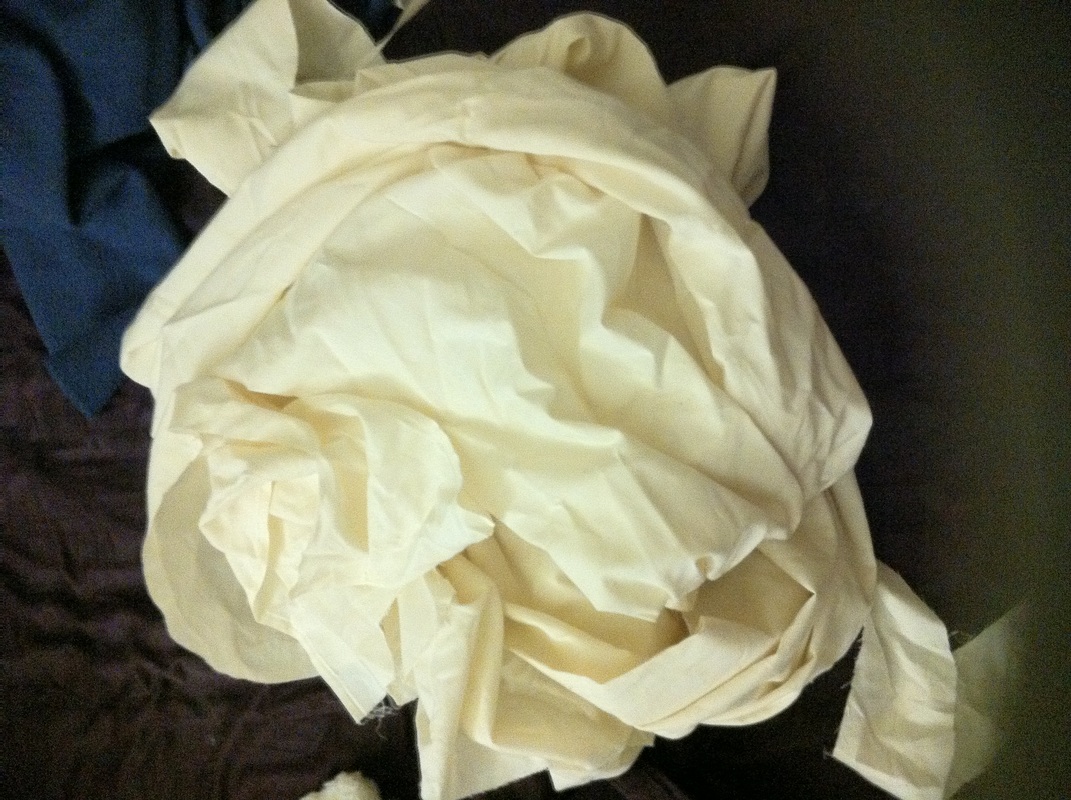 So I usually try to find a pattern at my local fabric store that is as close as possible to the design I need. If I can't find something that's exact I'll find something close to what I'm looking for and alter it later. If the pattern is super simple I'll use a t-shirt to help with the sizing and guidelines as I draw something up (mostly eyeballing to start). This is where mock-ups and cheap materials come in handy. Before cutting any of the real material I'll be using, I'll create the final patterns (when a pattern needed to be altered or is drawn from scratch) on the cheap material. A cheap material I've seen many people use for mock-ups (including seeing it used on Project Runway) is muslin. I'll typically buy 5-ish yards at a time. 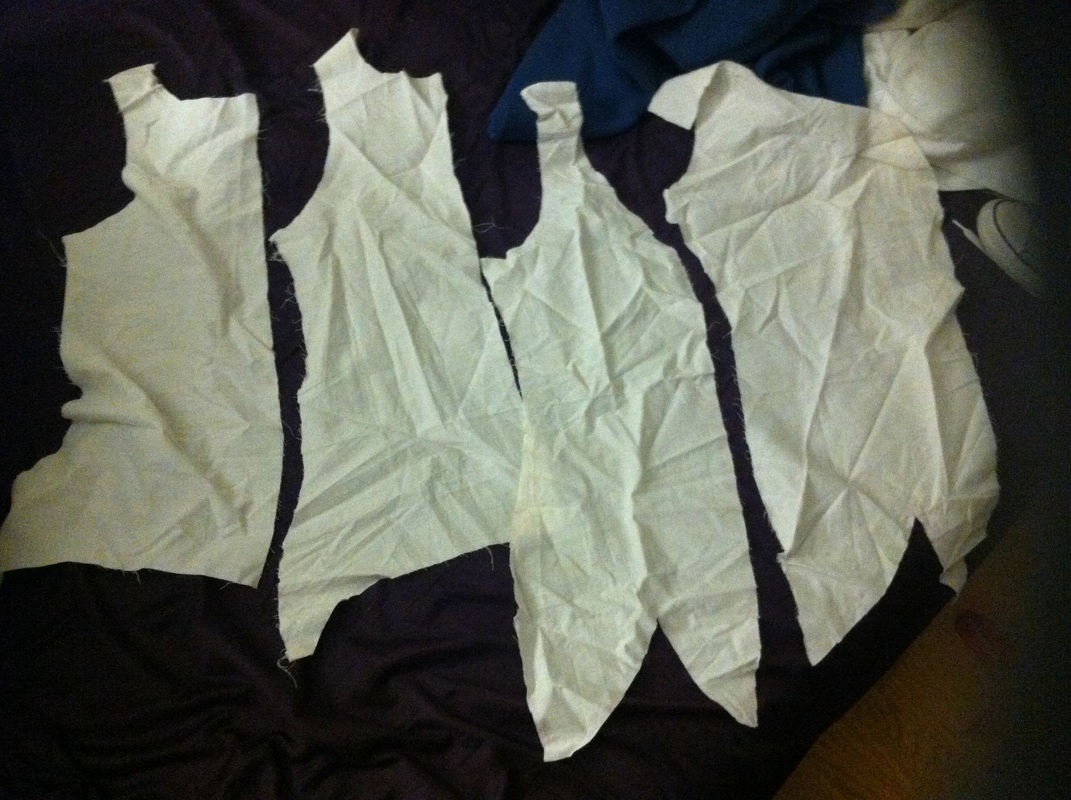 If I'm altering a pre-existing pattern, I'll trace all the pieces onto the muslin and then change what's needed, adding or taking away from the pattern. When it looks right, cut it out and pin it together (you can even sew it together if it has a lot of pieces, just keep a seam ripper nearby and use a loose stitch). 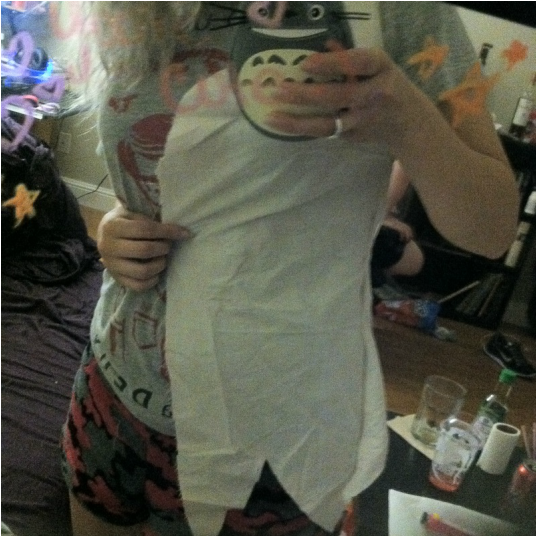 It's important to put it all together so that you can try it on and make sure it looks right and fits well. This is when you make any changes. It's easy to just cut and take away fabric if you need it smaller or redraw a piece if you need to make it bigger or add on more/completely change something. Using cheap fabric to create mock ups allows for you to make as many mistakes, changes, etc as you want without wasting any nice and/or expensive materials.  Once everything fits well and looks the way you want, it's time to undo any pins or stitching on the mock-up and transfer that pattern to the real fabric you'll be using. Sew it together and done! Add any finishing touches and details as needed, of course.
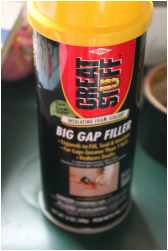
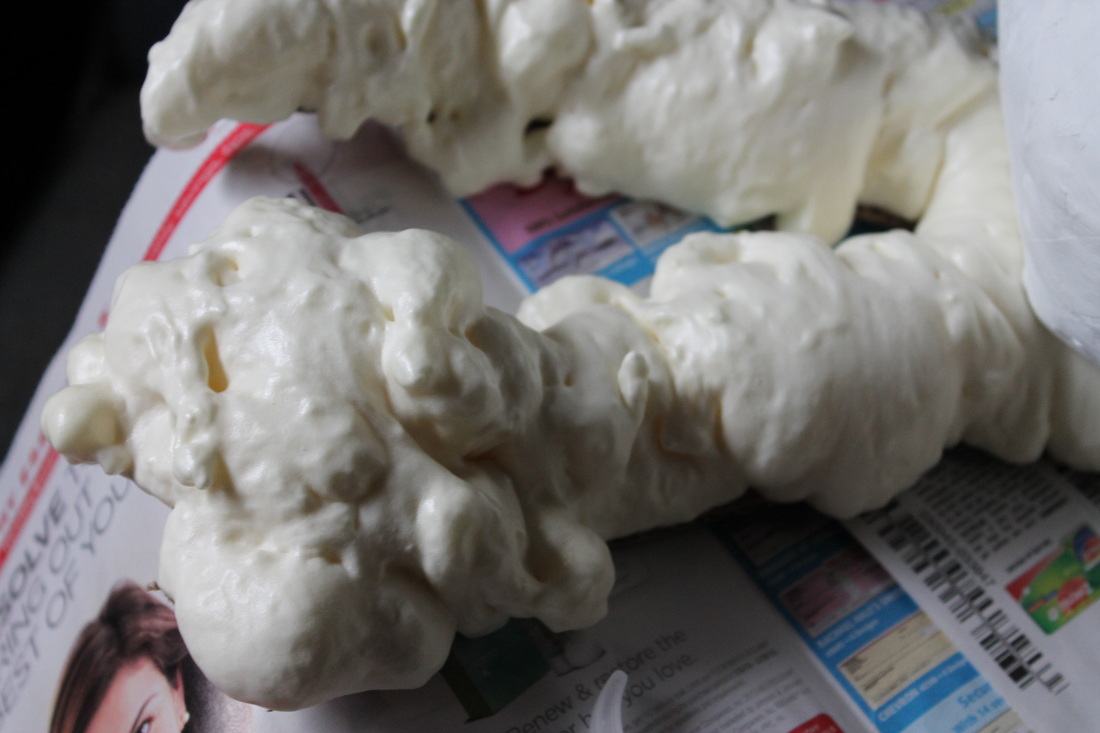
There are other ways of creating and making patterns as well. Some people use newspaper--I have and still will too, mostly when making armor. Newspaper is flimsy and can tear easily, so I don't bother too often with trying to make dress and pants patterns out of it (at least not when I'm wanting to wear it/try it on before using the real fabric). There's the duct tape method too. Although, I've found that with this, even when wrapping the duct tape as loosely as possible, it will still "corset" you a bit and the pattern can come out anywhere from slightly smaller to a lot smaller than what you needed, depending on how tight the duct tape was wrapped. It is handy when working with stretchy materials and designs that you'd want tighter. I hope this was well explained enough for you all to find it helpful! :) ~Positive outcomes only! :) 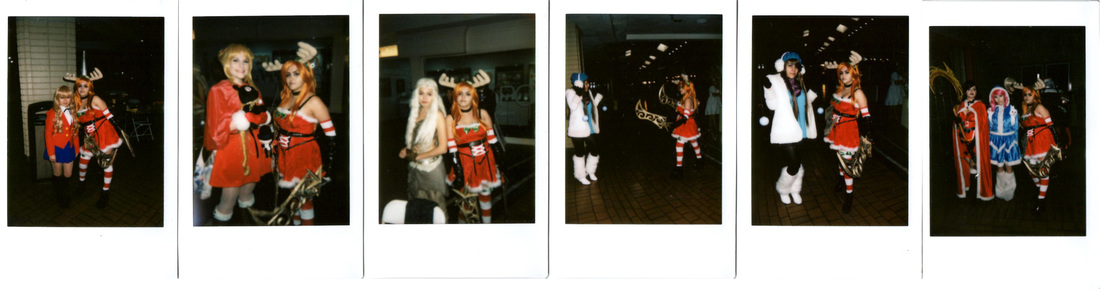 So here's a little over view of the Ani-Me Holiday Fest event I attended. The convention was a lot of fun. It's was a local, free convention that took place in a mall. The area itself was on the smaller side but it still had a large amount of people attending. And for the area we're in it's definitely one of the bigger (or even biggest) local conventions. The cosplay scene or amount of cosplayers who attend and cosplay at this series of conventions has definitely grown! There's so many amazing cosplayers too! And all the cosplays, whether bought or handmade, are so well done and always look great. 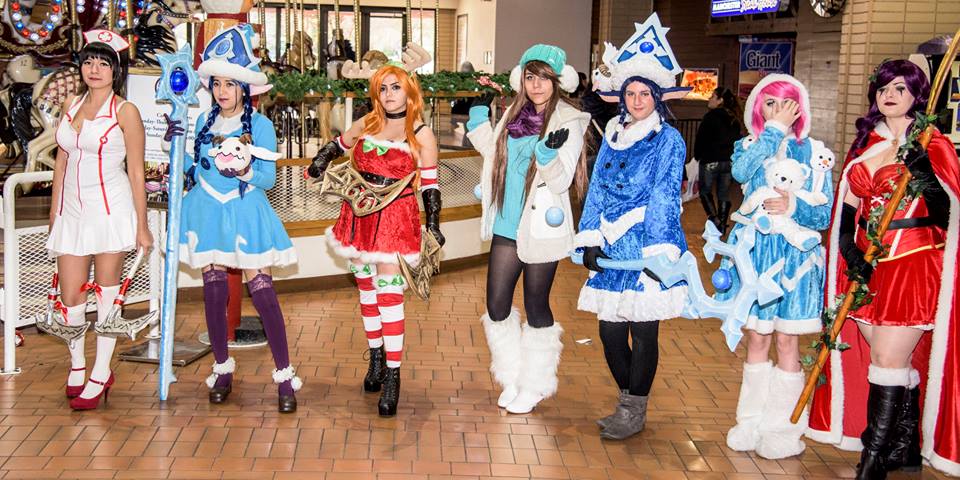 The two group photos were taken by Boss Man on Facebook. We had a gathering for all the cosplayers at the con and another one for all the League of Legends cosplayers since there was quite a few. Keep in mind the photo below wasn't all of the cosplays who attended, either. It was fun talking with and meeting the other local cosplayers. I also entered the little cosplay competition and derped out a bit on stage because I have no perception of time, whoops! There were also some pretty cool booths/tables! I really loved all the artist tables, they're all so talent--I wanted to buy so many prints. There were some funny and creative panels and performances, as well. 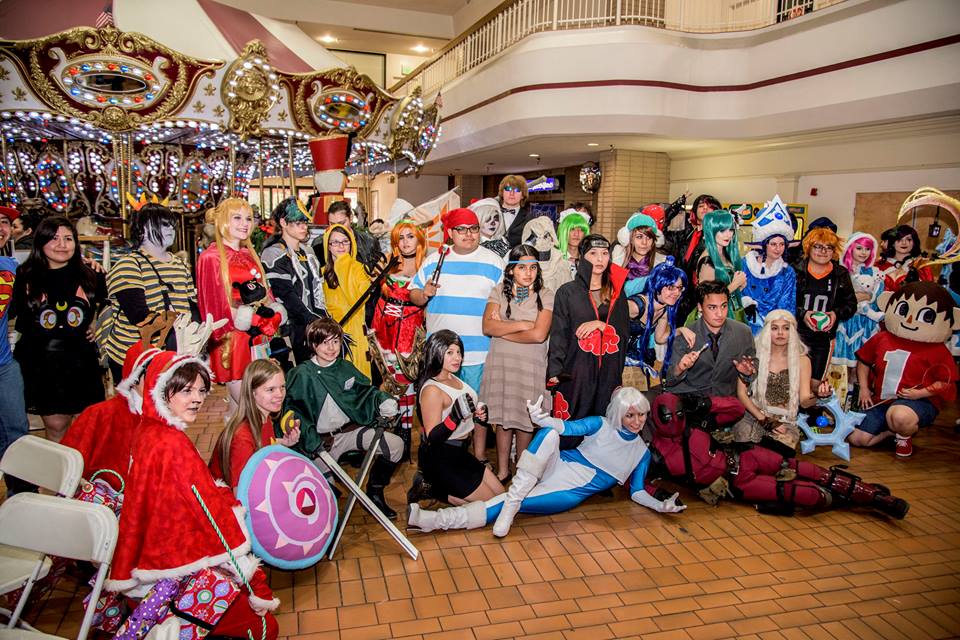 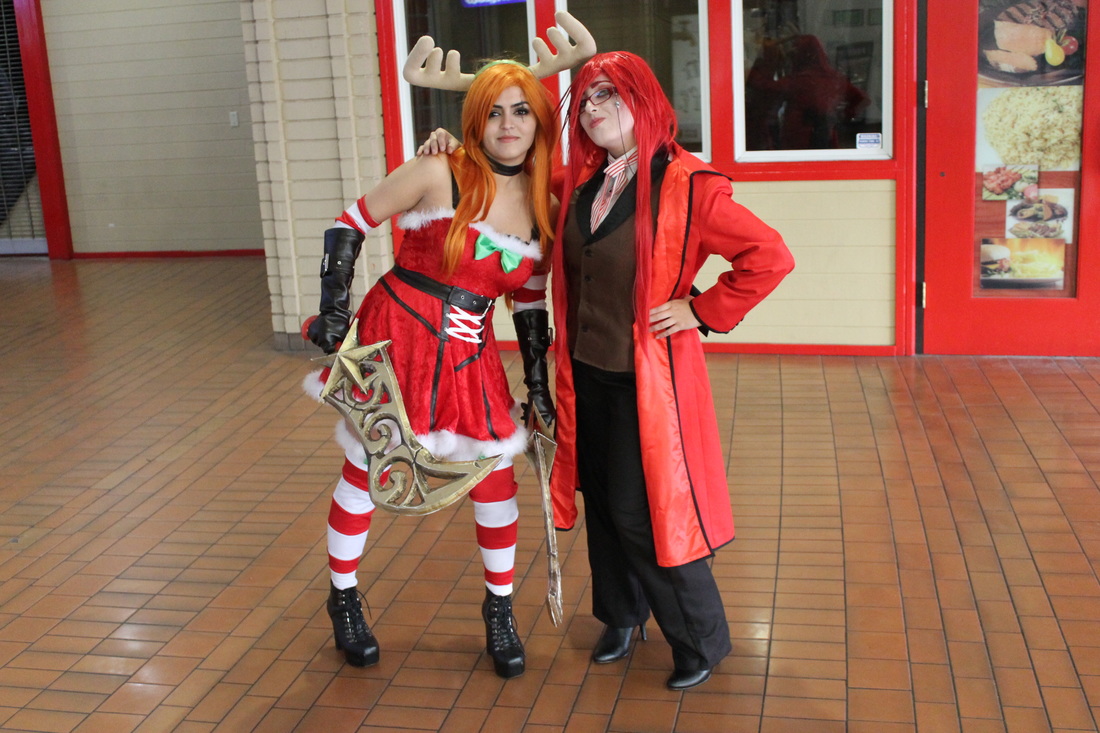 I cosplayed as Slay Belle Katarina from League of Legends and let me just say, this cosplay did not want to be made. Everything technology wise, like my sewing machine and Dremel kept breaking or not wanting to work correctly. So I had to improvise and injured myself many times in the process, then proceeded to ignore safety directions for products like Bondo and spray paint--breathed in way too many fumes I shouldn't have and got it in the cuts on my finger. Follow the safety directions! Don't take short cuts like me in attempt to finish something in time. Luckily I ended up getting help doing the sanding on my props from my cousin. She'd never done anything of the sorts, nor is really interested in it, but she's super supportive and helpful and it was really nice of her to help me out! I'm pretty happy with how this costume turned out. I wish I could've gotten the props a little smoother but I didn't choose the best materials to make them from. I also wish some of my stitches and seams were nice, but my sewing machine kept doing odd things which messed up the stitches, ate the fabric or resulted in loose/un-stitched pieces that I had to resew. It still got the job done and unless you're specifically looking at the poorly stitched parts it's not ever noticeable. I created everything but the shoes from scratch on this costume! The headband was an old one I removed all the decorations off over and replaced the fabric with green. Then I made antlers and attached those to the headband. I made the pattern for the dress using muslin before sewing the final product.I made all the belts from scratch as well and punched all the eyelets in both the belt and corset pieces, then added Velcro so the extra ends of the belts would stay put. I also created the striped fabric by combining two different ones and hand sewed all the furry bits onto the costume. I'll have more about all the specifics in a later post. Overall, the convention was super fun and I love seeing how the Ani-Me conventions are growing. I really enjoyed the artist tables and fellow cosplayers. It's always fun to see and share creativity! I'm so excited and will not only be attending, but help in judging the cosplay competition at the next Ani-Me convention, Ani-Me 5.0. ~Positive Outcomes Only~ 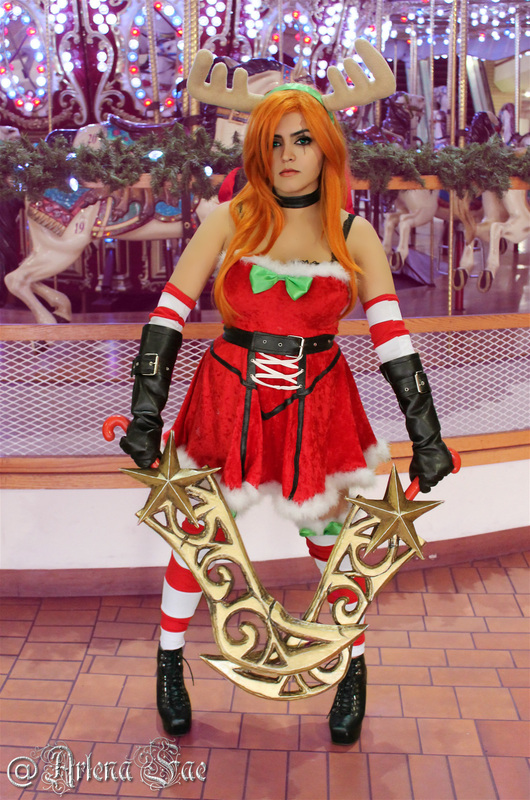 This specific post is for the cosplay (or costume part) only. I'll have another post coming all about how I made the prop. 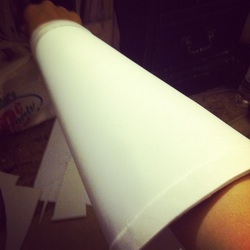 I made the "gauntlet" using craft foam. I used no sort of hooks/clasps/Velcro in order to allow it to come on and off. I made the smaller end as large as the widest part of my hand (when you put all your fingers together--in a cone shape almost). I created a cone shaped pattern using news paper before transferring that to craft foam. 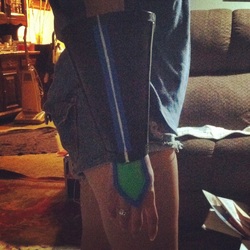 I added details with small strips of craft foam as well. After the shape was finished I coated it in PlastiDip as the primer.  For the pants I purchased blue leggings off eBay. For the shoes I used old boots I had bought at Wet Seal years ago now. I didn't modify any of these in any way.  For the shoulder piece I used cardboard to create the basic shape. The two sides and top where all cardboard pieces. The rounded bottom (almost awkward half circles) where craft foam and the side piece that curves in and faces away from the body. On the inside there were a few pieces of cardboard that connected to the different sides in order to give extra support and sturdiness. A thicker craft foam was used to create the gold part on the two side pieces in order to give it dimension. So the red part was the cardboard itself and then the gold bordering that was thicker craft foam. The circles and "pipes" where made using EVA foam (small puzzle-like mats). I cut out a circle then outlined it using strips of the EVA foam and made the pipes the same way. All my craft foam pieces where glued together with hot glue (and any pieces that I felt needed to hold a bit more weight I glued using super glue). On the back of the two circle pieces I place Velcro squares that would attach to the Velcro pieces I sewed onto the jacket. For the nuts and bolts I used different sized googly eyes. This piece was primed using wood glue. And painted with both acrylic and spray paint. I can't really explain how I created the shapes I did. It was done by eyeballing it until I was satisfied and trail and error.  For the chest plate, I took an old bra and added craft foam detailing. Then I created the larger bottom piece out of craft foam, added detailing and attached that to the bra using hot glue (I attached it while wearing it --obviously I did it carefully). Once that was done, I primed everything (even the fabric part) using PlastiDip and spray painted it. I used spray paint for both the red and gold, so in order to keep the gold paint from getting onto the red areas, I covered the areas I wanted to stay red completely in painter's tape. Once the tape was secured and everything I wanted was covered I went ahead and painted the gold parts. After that dried, I could easily peel off the painter's tape.  While wearing the chest plate I patterned the belt using the tape+foil/plastic wrap method. Marked my pattern and cut it out. Then transferred that onto the fabric and cut and sewn that.  I attached the belt to only the chest plate (so not the bra band) using hot glue along the top and bottom only.  I created the center piece using craft foam, primed it with wood glue and painted it with both acrylic and spray paint. I attached that with hot glue as well.  I patterned my jacket before attaching all that. I patterned it using the tape+plastic wrap and then continue to add to it while wearing my chest plate. The way my chest plate and jacket works it, the bra band goes under the jacket while the belt part goes on top (this is why I did not glue the belt to the bra band). The jacket only attaches and meets in the front at the bottom half, the top part was designed to be completely open (almost in a u shape) at the chest then begin to meet or close more near the neckline (reference other photos). 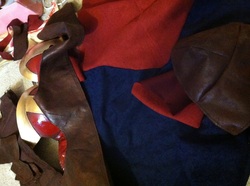 I used a velvet-like material to create the red and blue parts of the jacket. For the brown I used a kind of fake leathery material. For the inside of the collar I used a fake wool-like material. The shoulder piece was made using one long rectangular piece and two curved triangle pieces. The two triangle pieces made the top section and the rectangle made the bottom (this shape allowed the piece to curve over my shoulder). As for more about the jacket shape. I eyeballed it and altered the pattern I made as needed. It was trail and error so I can't exactly explain all the different shapes that went into it. Look at reference photos often to see where different lines fall and colors are since the jacket is made out of multiple colors and materials. 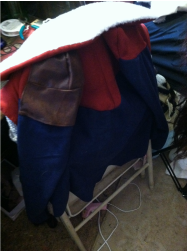 The front part of the jacket (at the bottom) over lapped so that I could have it close using Velcro. I also attached a piece of clear elastic to the front top pieces (the points that begin to come back in above the chest) so that they stayed rested in place. I attached the collar last. I attached the inside wool piece onto the collar first, before attaching the whole collar onto the jacket. 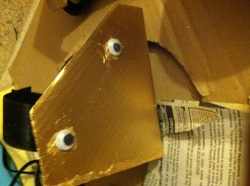 For the knee pieces, I was lucky to have these cardboard pieces that came off of a frame I recently purchased. I only had to readjust how open the where (so that it'd fit around my legs). I used googly eyes for a nuts and bolts effect. I used strips of Velcro that wrapped around my leg to attach all the leg pieces.  The bottom two leg pieces where made using craft foam and primed with PlasticDip. I used spray paint to paint them. The shape was this curvy "I" shape almost (look up reference photos or the game model for better ideas).  I didn't own any glove patterns at the time so I made one using the same plastic wrap+tape method I had been. There are other ways of making simple glove patterns though. For the left glove I made the "metal" piece using craft foam and looking at the game model/splash art as reference for the shape. I primed it with wood glue and painted it with spray paint. For the belt I created the belt buckle with card board and glue it onto an old belt I had. I didn't own a heat gun at this time but I would recommend using one. The leg pieces for example, didn't keep the shape I wanted. Had I used a heat gun (or a similar method) I would have been able to mold it to custom fit around my legs better and it would have kept it's shape. 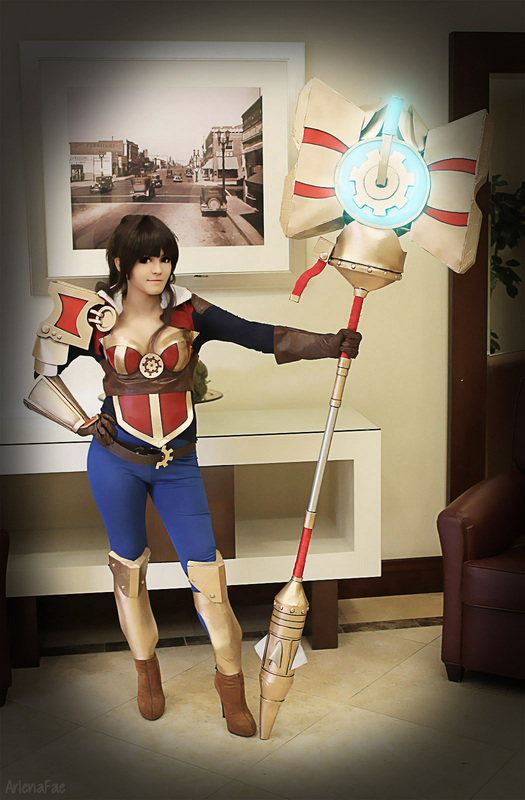 I've seen quite a few posts in the past where someone will mention only using expanding foam once (as in, once it's been opened/used it can no longer be saved to use later). I guess that's the "proper" way to use it since it does only come with one nozzle that'll get plugged up once the expanding foam dries. I've always re-used and saved my expanding foam though, especially since I never use a whole can on one thing. Here's how for any of you who may have been tossing it out before it's empty. *Remember!* Wait till the foam is fully dried before doing this. Otherwise it just becomes a gooey mess and doesn't come out in one nice piece, nor as easily.
This is the expanding foam I used and a cosplay piece I used it on. 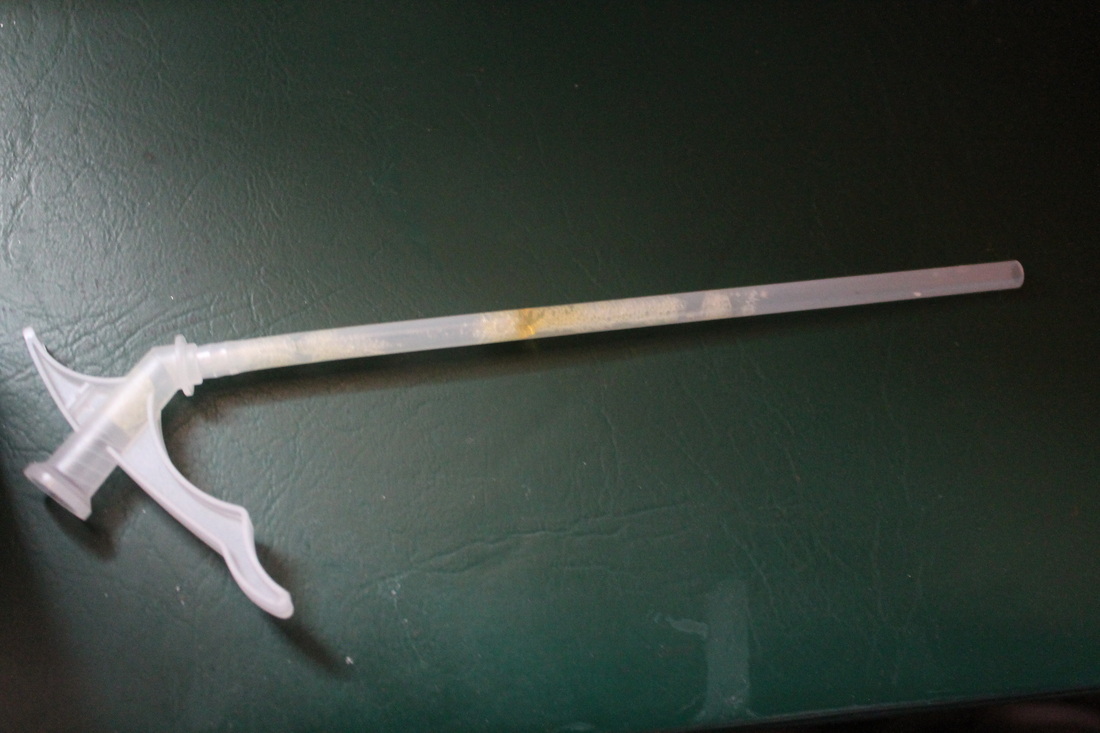 As you can see foam can and probably will end up drying in random spots along the tube. Sometimes it's not fully blocked and others it's just hopeless. 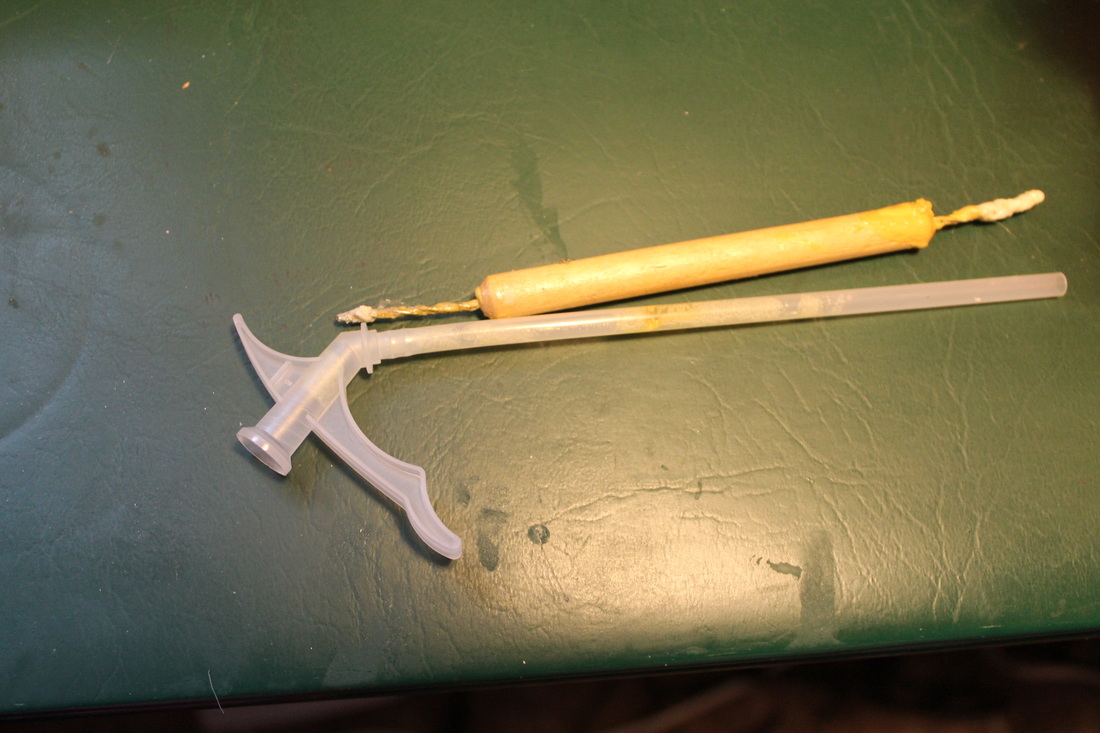 In cases where it's blocked I'll find something that'll be able to scrap it out. Not everything is long enough though as you can tell in the photo above. I'm using some random tool I had lying around but even a toothpick can work. 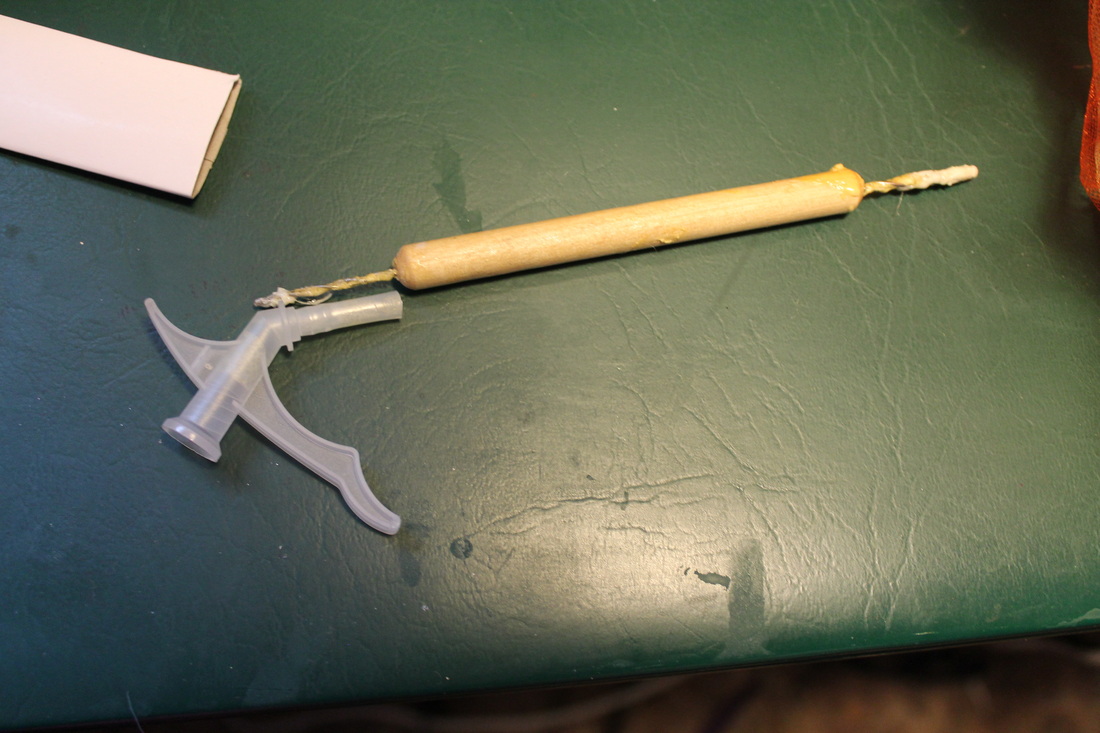 When the nozzle is too long for the tool I simply just cut it down. I've never had a problem with it changing the way the expanding foam its applied. 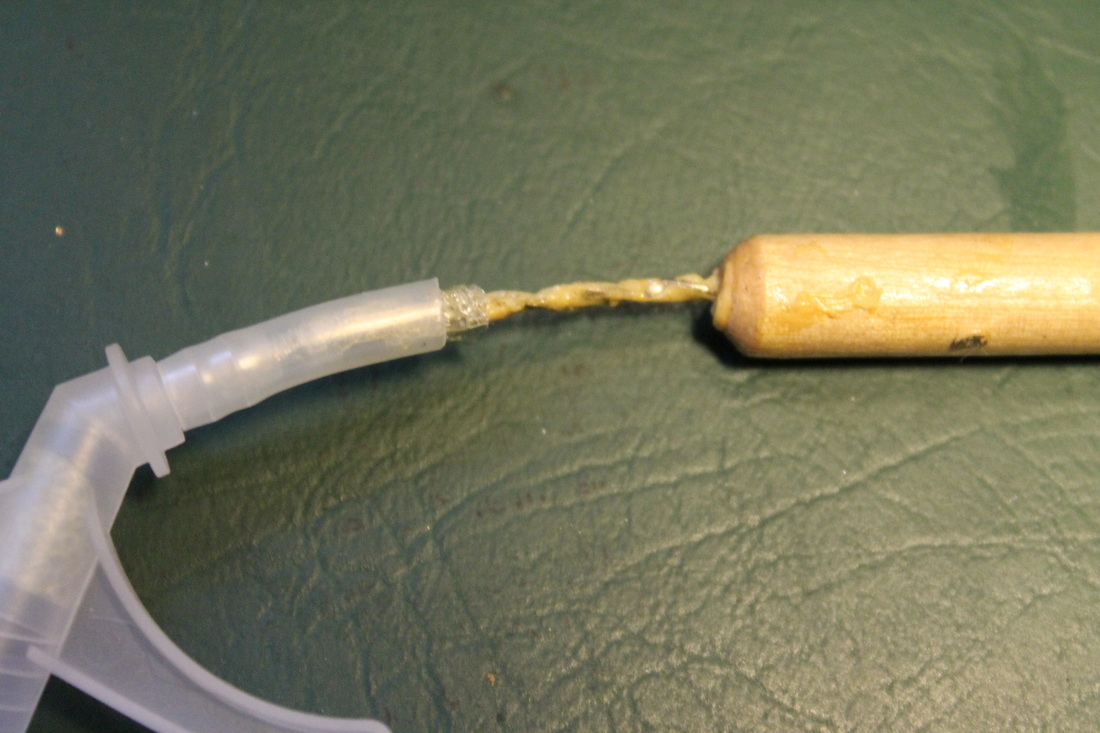 It may take a couple tries especially if what you're using has no ridges. If you just press and pull along the side though you'll be able to pull out any dried foam. 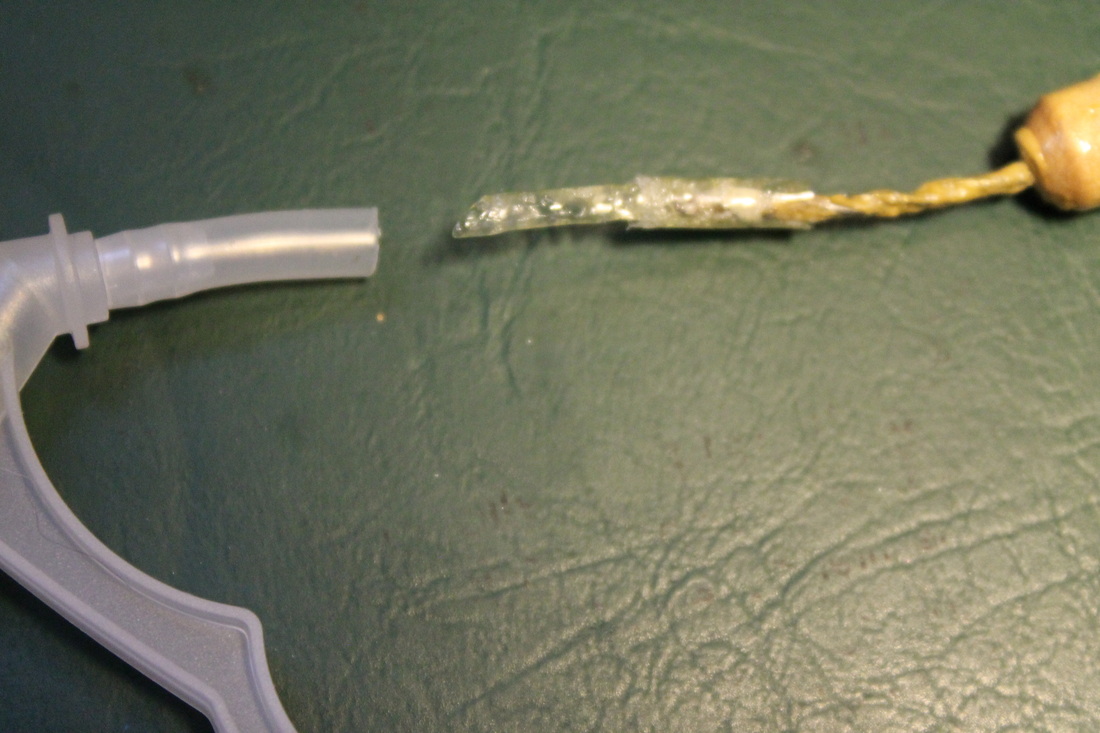 It should easily come out in one piece. 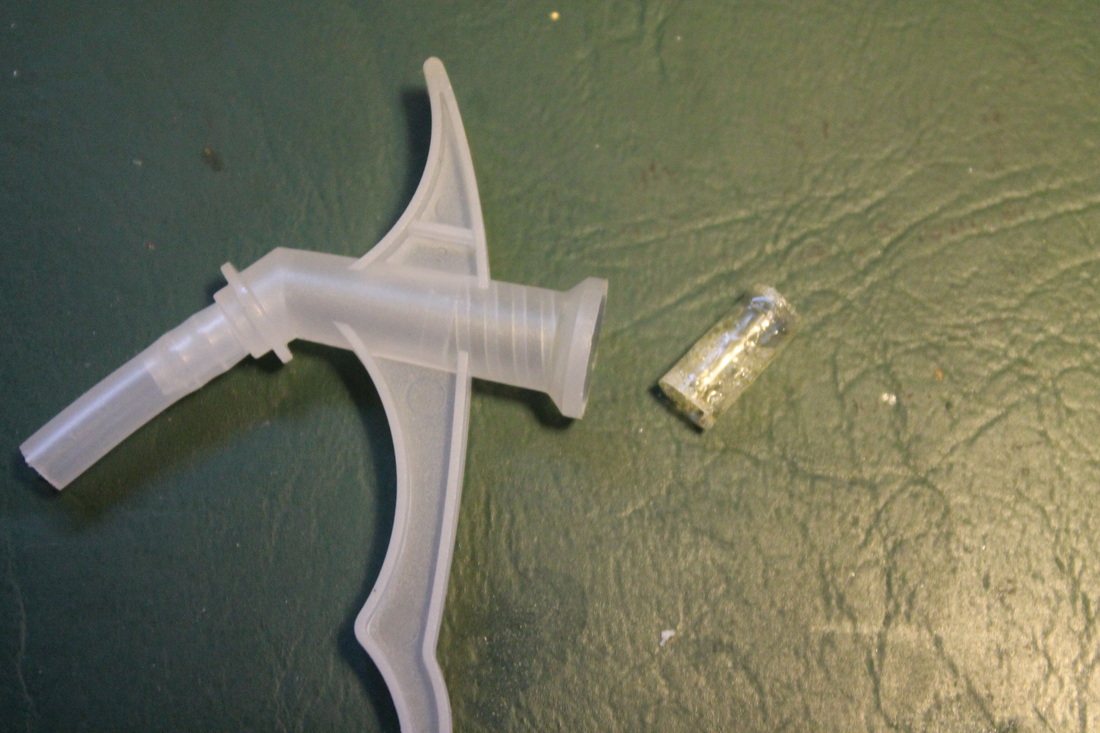 Now do the same for the other end. 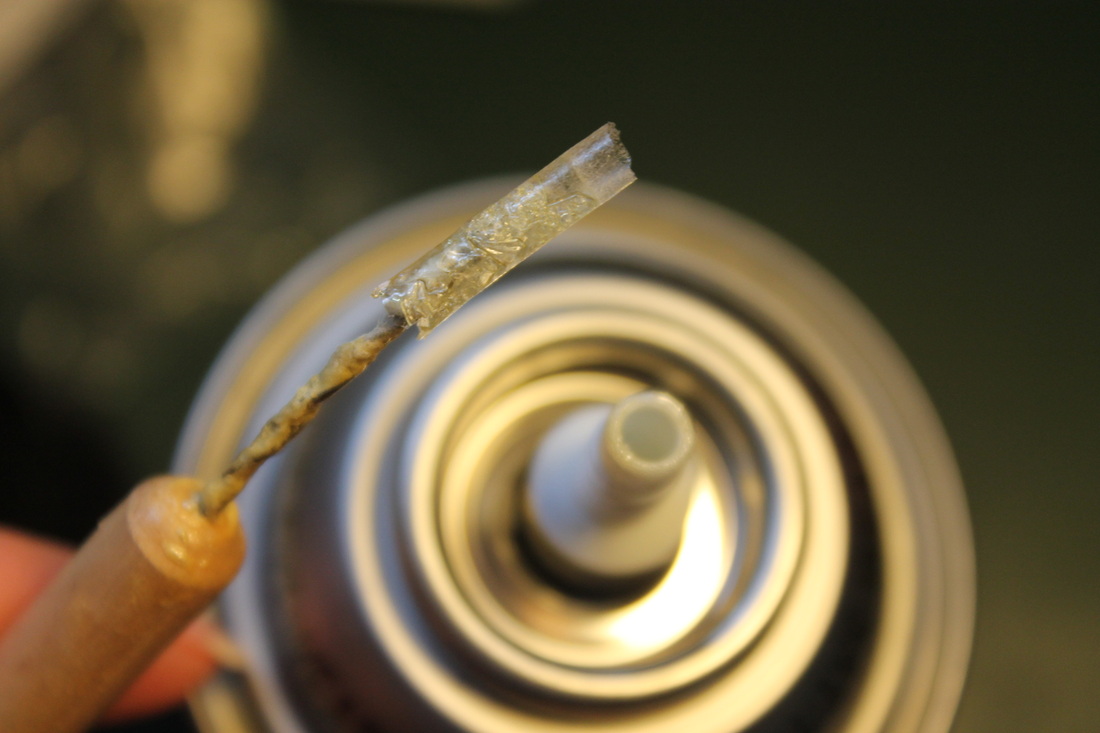 And one more time for the nozzle that's attached to the can. Then just reattach you cleaned nozzle/tubes and its ready for use!
So there's been many articles and statements come out from and about Comic book authors/creators and their dislike of cosplayers.
One of the biggest thing that bugs me about some of the things were said is blaming cosplayers for profit loss and the comic book creators not getting recognized. If your products aren't selling, that's your fault. You're obviously not marketing your products well enough, even if it feels like you are. Media is so huge, so many things are popular, so it's going to be a lot harder to bring attention to these things that used to be incredibly popular but have since died out a little (or have never been/are new). Revamp it, jump on different marketing strategy band wagons, make yourself relevant and important to mainstream media. As for the recognition part. Really, you just need to sell yourself better. I am going to hate myself for this example, but look at Kim Kardashian. Whether you love her or hate her she keeps herself in the spotlight, maybe not always in the best light, but still in the spotlight. She keeps her self relevant and knows how to draw attention, making her a household name. If you're really that desperate for recognition learn how to sell yourself, use the media and social sites. To be honest though, there are plenty of readers and fans who don't really care to learn much about or even who the author/creator is. There's a good portion who just read and enjoy the story and don't bother with all the "little" details. Example; there's a lot of people who are fans of the Marvel movies, but that's about it. They like the movies, the superheros but don't bother with the comics or the writers because they just want enjoy the "entertainment part". I understand, you have to share the spotlight now with people who were once just fans. Yeah it's difficult to adapt to. But things change and either you learn to stay relevant, open-minded and change with it or you simply get left behind --life isn't meant to be fair or stagnant. Another honesty thing here: there is a lot of people (both non-cosplayers and cosplayers) who just don't care to meet anyone at conventions. Guilty! Yes I don't really bother with meeting any of these guests at cons and if that was all cons were, I probably wouldn't care to go. But they're not, cons are so much more than they used to be and it's a good thing. It brings in a bigger crowd and allows for this community that was once shunned and frowned upon to grow and let people become more open-minded to it. Cosplay gives fans a chance to be apart of the action and enjoy the con (and character/comic) in a different way, instead of just being another guest (which some people are happy with that, and that's okay). Cosplay is an art form though, and it allows so many people to mix two things they're passionate about (a fandom and art form) into one. Side note: Why do I (and possibly others) not care to meet guests? Because waiting in those lines just isn't as fun and would be much less fun, for me personally, in everyday clothes. Now, I will try to meet people who are my favorite voice actor, illustrator, animator, etc etc... But I don't try to meet everyone from anything and everything I'm a fan of. I'd rather meet other fans, look around the dealer room, interact with other cosplayers and go to different panels. Like, I really don't want to pay the couple hundred (ticket + hotel room prices) it takes to be there to just stand in a line for the whole weekend to get a picture and autograph with and meet a guest for about 30 seconds. Here's a good tip for you (the authors); instead of fighting against cosplayers, how about working with them. Think of how YouTubers do collaboration videos to boost up their own fanbase/views. Work with cosplayers. Example: companies in the past have hired cosplayers for promotional gigs. Try befriending some and interacting more with the ones who cosplay characters from your comics. They're obviously a big fan. And if they're not, well this is my next topic: One said something about getting angry after a cosplayer mentioned that they wanted to cosplay a character they didn't know much about because they enjoyed the design and it was relevant. First lets note: cosplayers cosplay certain characters for a lot of different reasons and it's not always because they're a fan. Sometimes they just love the outfit, sometimes it was something easy and affordable, other times it's something someone else suggest or requested and so many more. That's okay. Yes I said it, it is okay to cosplay a character for a reason other than you're a fan. Gasp, I know. Alright, so what the author/artist decided to do after being told that by the cosplay was throw him out of his booth/panel. That is the worst decision you could have made. You had the chance to educate him on the characters/comic, and gain a new fan and consumer but instead you risked turning him off to this entire community and made yourself look like an ass. Congratulations. Now here's a better option you could have went with, especially since you're so worried about profit margins: Told him more about the character. Offered him merchandise, comics, draw him in and try to sell him products. Even if he didn't buy it right there and then you could have told him where your products could be found elsewhere --like online. How hard would that have been, you would've had a new fan/consumer and the guy would've probably became an even bigger/loyal fan with how much effort he felt you put into the conversation--even if it's a short one. And this brings us to our next topic: Cosplayers don't buy anything. Or at least someone stated at their booths cosplayers are usually the ones to just look but never buy. I'm going to let you in on a little secret: they buy things later, when not in cosplay. GASP! Yes, they actually dress like normal people at some point during the convention, shocking! Don't believe me? I'll explain why and how this works as simply as possible: Cosplays are heavy. There's usually not a lot of room to put something as small as a cellphone and wallet, let alone figurines, books or swords. Why not carry a bag? Because unless you've customize it--and sometimes even then--it can take away from the cosplay, and you don't always (or even anytime) put down your bag in a crowded hall every time someone wants a picture --which can happen a lot, like every other second, or you're standing there for a few minutes at a time. People work hard on their cosplays, like it to be as accurate as possible, look good and don't want to lug around extra baggage. Also, some cosplayers have giant props taking up both hands, making the cosplay really heavy --they don't need the extra weight. So here's what they do instead. They wear their cosplay happily around all day or a few days and either for a part of everyday or one or two days out of the convention they don't wear it. They put on their everyday clothes and those things they were looking at earlier when you got mad because "cosplayers don't buy anything", they go and buy them. Alright, so what if they don't buy them. They spent all their money making the cosplays. Yeah, okay, that happens. But they also spent all their money in order to go to the convention --they aren't cheap, and only getting more expensive. It doesn't mean they won't buy any of your products ever. In fact, a lot of people (both cosplayers and non-cosplayers) don't buy anything at cons. They'll look around, find what they like and later look it up online. Why? Because some booths like to bump up their prices at conventions, it's much easier to find it at stores back home or online for a better price. Don't over price items just because you're at a convention (like those nearby food places, darn them) and try giving out business cards to those who are just looking so they know where to find you if they can't afford to buy anything right then. At the end of this all, cosplayers aren't what is bringing down your business. It's your inability to adapt and bluntly put, asshole-like attitude that is. Things are changing. Things are always going to change, in every aspect of life, and there's nothing you or anyone can do to stop it. It's just how life works. So adapt to it and learn to use it as an advantage instead of letting it be your downfall. If you didn't look at it all in such a negative and bitter way, placing all the blame on everyone but yourself, maybe you wouldn't have this problem. So try and learn some better marketing skills (and communication skills), work with your fans instead of attacking them, and keep yourself ever-adapting and relevant, and maybe you'll end up doing just fine... And you'll have to hope that what's a big part of the community, can forgive your ever-so-salty comments. ~Positive outcomes only :) |
Arlena FaeCosplay Tutorials. Hauls & Reviews. Photography. Rambles and Advice. Categories
All
Archives
August 2018
Use the code: "arlenafae" for 10% off purchases at:
http://fashionkawaii.storenvy.com/ |
 RSS Feed
